Knife Safety for Beginners: Basic Knife Skills Every Home Cook Should Know
A good knife can become your favorite kitchen tool, but it can also feel intimidating if you’ve never learned how to use one correctly. Many beginner cooks are nervous about chopping vegetables, slicing meat, or simply holding a chef’s knife. The good news is that knife skills aren’t about strength or speed. They’re about using the right techniques safely.
Learning proper knife safety will help you cook faster, make your food cook more evenly, and most importantly, protect your fingers while building confidence in the kitchen.
In this lesson, you’ll learn the essential knife skills every beginner should know, from choosing the right knife to mastering the most common cuts you’ll use in everyday cooking.
We use affiliate links on our site. This post may contain affiliate links and we may earn a commission on qualifying purchases. Please see our affiliate disclosure for more details.
What you will learn
By the end of this lesson you’ll be able to:
- Choose the right knife for the job.
- Hold a knife safely and comfortably.
- Use proper cutting techniques.
- Learn the most common knife cuts.
- Care for your knives so they last for years.
CHAPTER 1: Choosing the Right Knife
When you first start cooking, it can seem like every recipe calls for a different knife. Walk into a kitchen store and you’ll find dozens of options, from tiny paring knives to large carving knives and specialty blades designed for one specific task.
The truth? You don’t need a drawer full of expensive knives to become a great home cook.
Most beginner cooks can prepare nearly every meal with just three basic knives. I have a full knife set that I bought probably 10 years ago. I have a couple knives in the set that I never used once.
I have one I use for almost everything from slicing lemon rosemary roast turkey to slicing the vegetables for my ranch pasta salad.
Chef’s Knife
A chef’s knife is the workhorse of the kitchen. If you only buy one quality knife, make it this one.
Use it for:
- Chopping vegetables
- Slicing meat
- Cutting herbs
- Dicing onions
- Mincing garlic
- Most everyday prep work
An 8-inch chef’s knife is the perfect size for most home cooks because it offers a great balance of control and versatility.
Paring Knife
A paring knife is small, lightweight, and designed for detailed work.
It’s perfect for:
- Peeling fruits
- Trimming strawberries
- Cutting small fruits and vegetables
- Removing stems
- Coring apples
- Peeling potatoes
Think of it as the precision tool in your kitchen.
Serrated Knife
A serrated knife has a saw-like edge that easily cuts through foods with a firm exterior and soft interior.
It’s best for:
- Bread
- Bagels
- Tomatoes
- Cakes
- Sandwiches
Instead of crushing delicate foods, the serrated edge gently slices through them.
Do You Need a Full Knife Set?
Not at all.
Many beginner cooks believe they need a large knife block before they can cook well. In reality, a quality chef’s knife, a paring knife, and a serrated knife will handle nearly every recipe you’ll make at home.
As your confidence grows, you can always add specialty knives later.
What Makes a Good Kitchen Knife?
A good knife doesn’t have to be the most expensive one on the shelf.
Look for a knife that:
- Feels balanced in your hand.
- Has a comfortable handle.
- Holds a sharp edge.
- Isn’t too heavy or too light.
- Feels natural to control.
If possible, hold the knife before buying it. The right knife should feel like an extension of your hand rather than something you’re fighting against.
Why Sharp Knives Are Actually Safer
This surprises many beginners.
A dull knife requires more force to cut through food, making it more likely to slip unexpectedly. A sharp knife slices cleanly with less pressure, giving you better control over every cut.
Think of a sharp knife as a well-tuned bicycle. It responds smoothly and predictably. A dull knife is more like riding with sticky brakes and a wobbly wheel. It takes more effort and is harder to control.
That doesn’t mean a sharp knife is harmless. It simply means that with proper technique, it’s often the safer tool to use.
Pro Tip – Time to Sharpen
If your knife starts crushing tomatoes instead of slicing them cleanly, it’s probably time to sharpen it.
Coming Up Next
Now that you know which knives belong in a beginner’s kitchen, it’s time to learn the most important part of using them: keeping yourself safe while you cook.
CHAPTER 2: Knife Safety Rules Everyone Should Follow
Before you learn fancy knife cuts or how to chop an onion like a professional chef, it’s important to build safe habits. The best cooks aren’t the ones who cut the fastest. They’re the ones who stay in control of the knife every single time they cook.
These simple safety rules will quickly become second nature and help you feel more confident every time you step into the kitchen.
Always Use a Stable Cutting Board
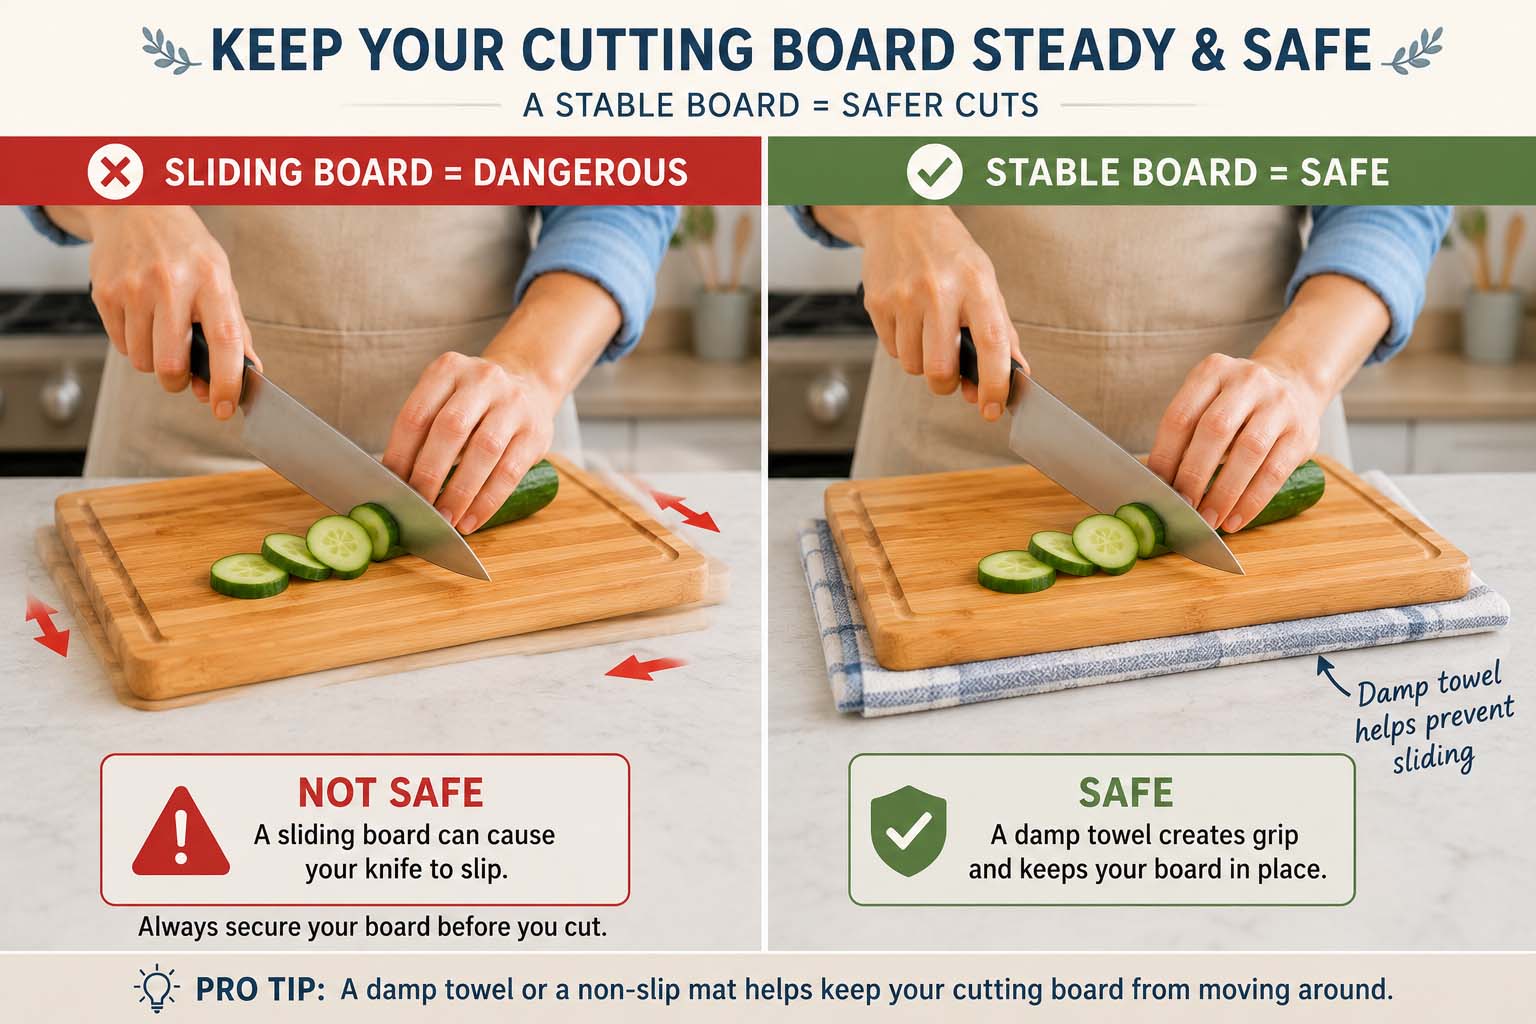
One of the biggest causes of kitchen knife accidents has nothing to do with the knife itself. It’s a cutting board that slides while you’re cutting.
If your cutting board moves even a little, your knife can move with it, increasing the chance of an accident.
Before you begin cutting, make sure your board is secure.
An easy trick is to place a damp paper towel or a damp kitchen towel underneath the cutting board. This creates friction and helps keep the board from sliding across the countertop.
If the board moves, stop immediately and reposition it before continuing.
Use the “Claw Grip”
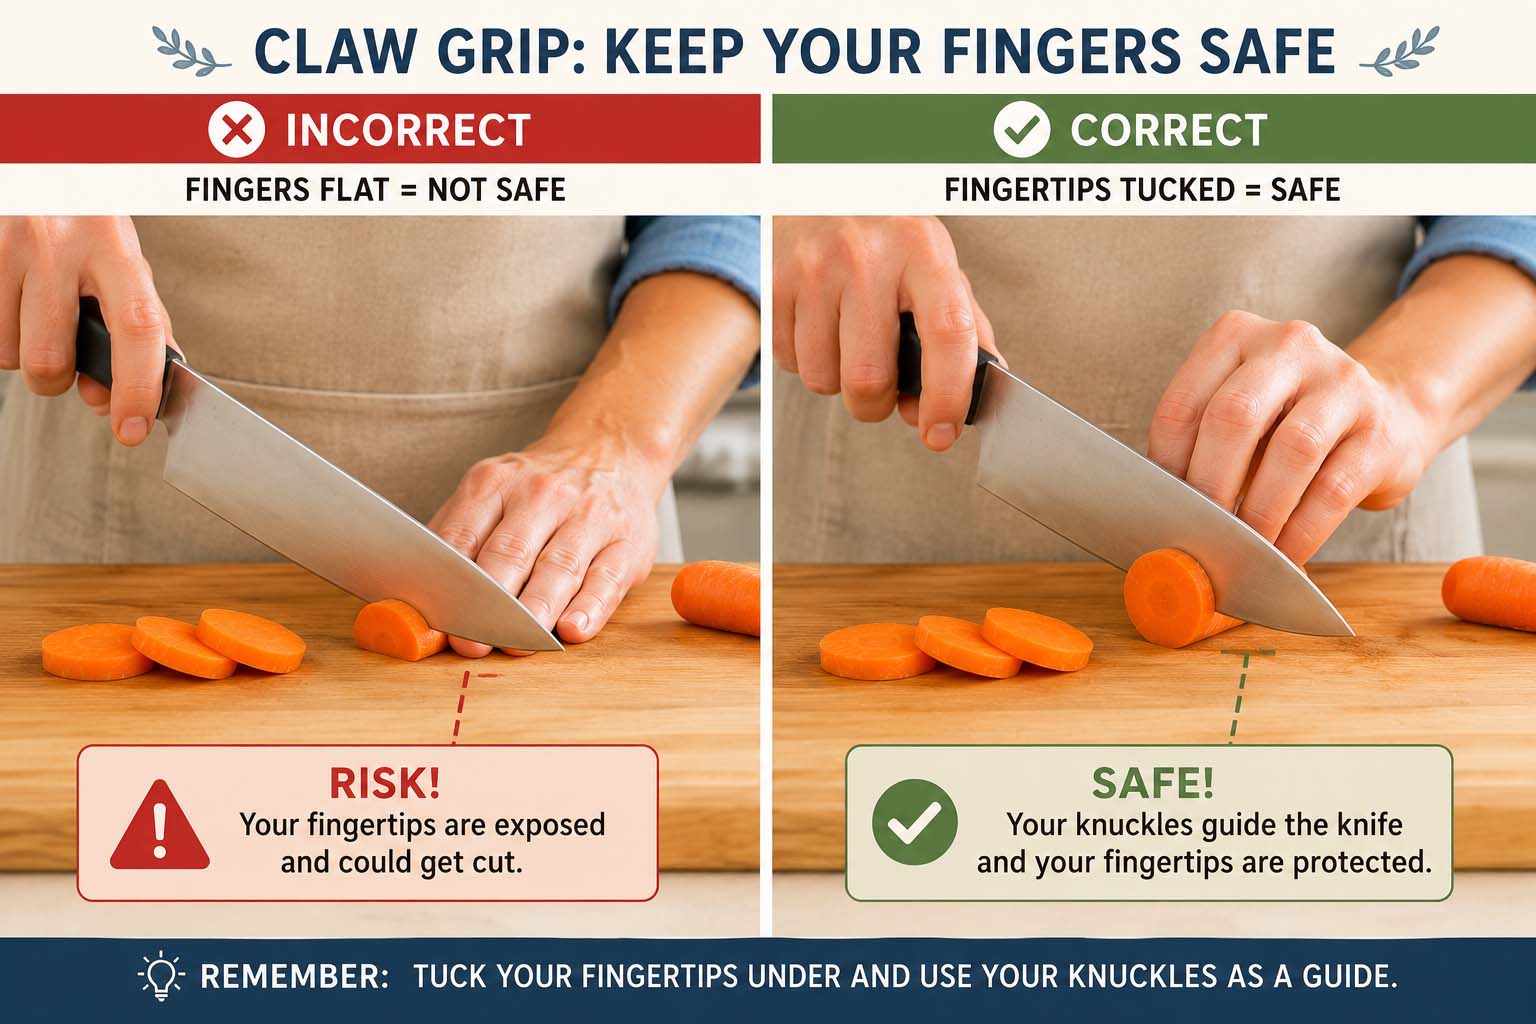
The claw grip is one of the first techniques taught in culinary schools because it protects your fingertips while giving you better control over the food.
Instead of laying your fingers flat on the ingredient, curl your fingertips inward so your knuckles face the knife.
Your knuckles become a guide for the side of the knife while your fingertips stay safely tucked away.
It may feel a little awkward the first few times you try it, but after a little practice, it becomes completely natural.
Remember:
✅ Knuckles guide the knife.
✅ Fingertips stay hidden.
Keep Your Eyes on What You’re Cutting
It can be tempting to look up and chat with someone or glance at your phone while you’re prepping dinner.
Try not to.
When using a knife, your attention should stay on the cutting board. Even looking away for a second can lead to a slip.
If you need to answer a text, stir something on the stove, or help someone else, simply set the knife down first.
Let the Knife Do the Work
Many beginners push down with a lot of force, thinking that’s how you cut efficiently.
Instead, allow the sharp blade to slice through the food using smooth, controlled motions.
Trying to muscle your way through vegetables usually makes the knife harder to control.
Slow and steady is almost always safer than fast and forceful.
Remember, speed comes naturally with experience. Focus on accuracy first.
Never Try to Catch a Falling Knife
This is one rule that professional chefs repeat over and over.
If your knife slips off the counter or falls while you’re cooking…
Let it fall.
Your instinct may be to catch it, but reaching for a falling knife often causes serious cuts.
Instead:
- Step back.
- Let the knife hit the floor.
- Pick it up carefully once it has stopped moving.
It may be hard on your pride, but it’s much easier on your fingers.
Carry a Knife Safely
If you need to move around the kitchen with a knife, carry it carefully.
Hold it at your side with the blade pointed down toward the floor.
If you’re walking behind someone, clearly say:
“Knife behind.”
This simple habit lets others know to avoid turning suddenly into you.
While you may not need to announce it at home every time, it’s still a great habit to develop if you’re cooking with family or friends.
Pass a Knife the Right Way
Never hand someone a knife blade-first.
Instead, place the knife on the countertop within their reach and allow them to pick it up themselves.
This simple practice greatly reduces the chance of accidental cuts.
Keep Your Workspace Organized
A cluttered cutting board makes cooking harder and less safe.
As you prep ingredients:
- Move finished vegetables into a bowl.
- Throw scraps into a trash bowl or compost container.
- Wipe away excess moisture if needed.
- Keep your cutting area neat.
A clean workspace makes it much easier to see what you’re doing and gives your knife plenty of room to move safely.
Don’t Leave Knives Hidden
One of the easiest ways someone gets cut is by reaching into soapy dishwater without realizing a knife is underneath.
Instead:
- Wash knives separately.
- Dry them immediately.
- Store them safely before moving on.
Likewise, never leave a knife buried under towels, ingredients, or other utensils on the counter.
A visible knife is a safe knife.
Build Good Habits Before Speed
If you’ve ever watched cooking competitions or professional chefs on television, it can seem like everyone chops vegetables at lightning speed.
Remember that those cooks spent years practicing.
Your goal isn’t to chop faster.
Your goal is to chop safely and consistently.
With practice, speed will come naturally. Trying to rush before you’ve mastered the basics usually leads to uneven cuts, frustration, or accidents.
Pro Tips – Safety
- Start slowly and focus on control rather than speed.
- Keep your knives sharp for cleaner, safer cuts.
- Replace worn or damaged cutting boards that wobble or crack.
- Keep a small bowl nearby for food scraps to reduce clutter.
- If you’re feeling tired or distracted, slow down and give yourself extra time while using a knife.
Kitchen Confidence Check
Before moving on, can you answer these?
☐ Which knife should you use for bread?
☐ Why is a sharp knife actually safer?
☐ What is the claw grip?
☐ What should you do if your knife falls?
☐ Why should your cutting board never slide?
Coming Up Next
Now that you’ve learned the essential safety habits, it’s time to start using your knife with confidence. In the next chapter, you’ll learn how to hold a chef’s knife properly, use the rocking motion, and make smooth, controlled cuts like an experienced home cook.
Chapter 3: How to Hold and Use a Knife
Now that you know the basic rules of knife safety, it’s time to actually use your knife.
Learning how to hold a chef’s knife correctly gives you more control and makes chopping, slicing, and dicing easier. You don’t need to move quickly or copy the lightning-fast chopping you see professional chefs doing. For now, focus on keeping your movements comfortable, controlled, and safe.
Speed comes with practice. Control comes first.
How to Hold a Chef’s Knife
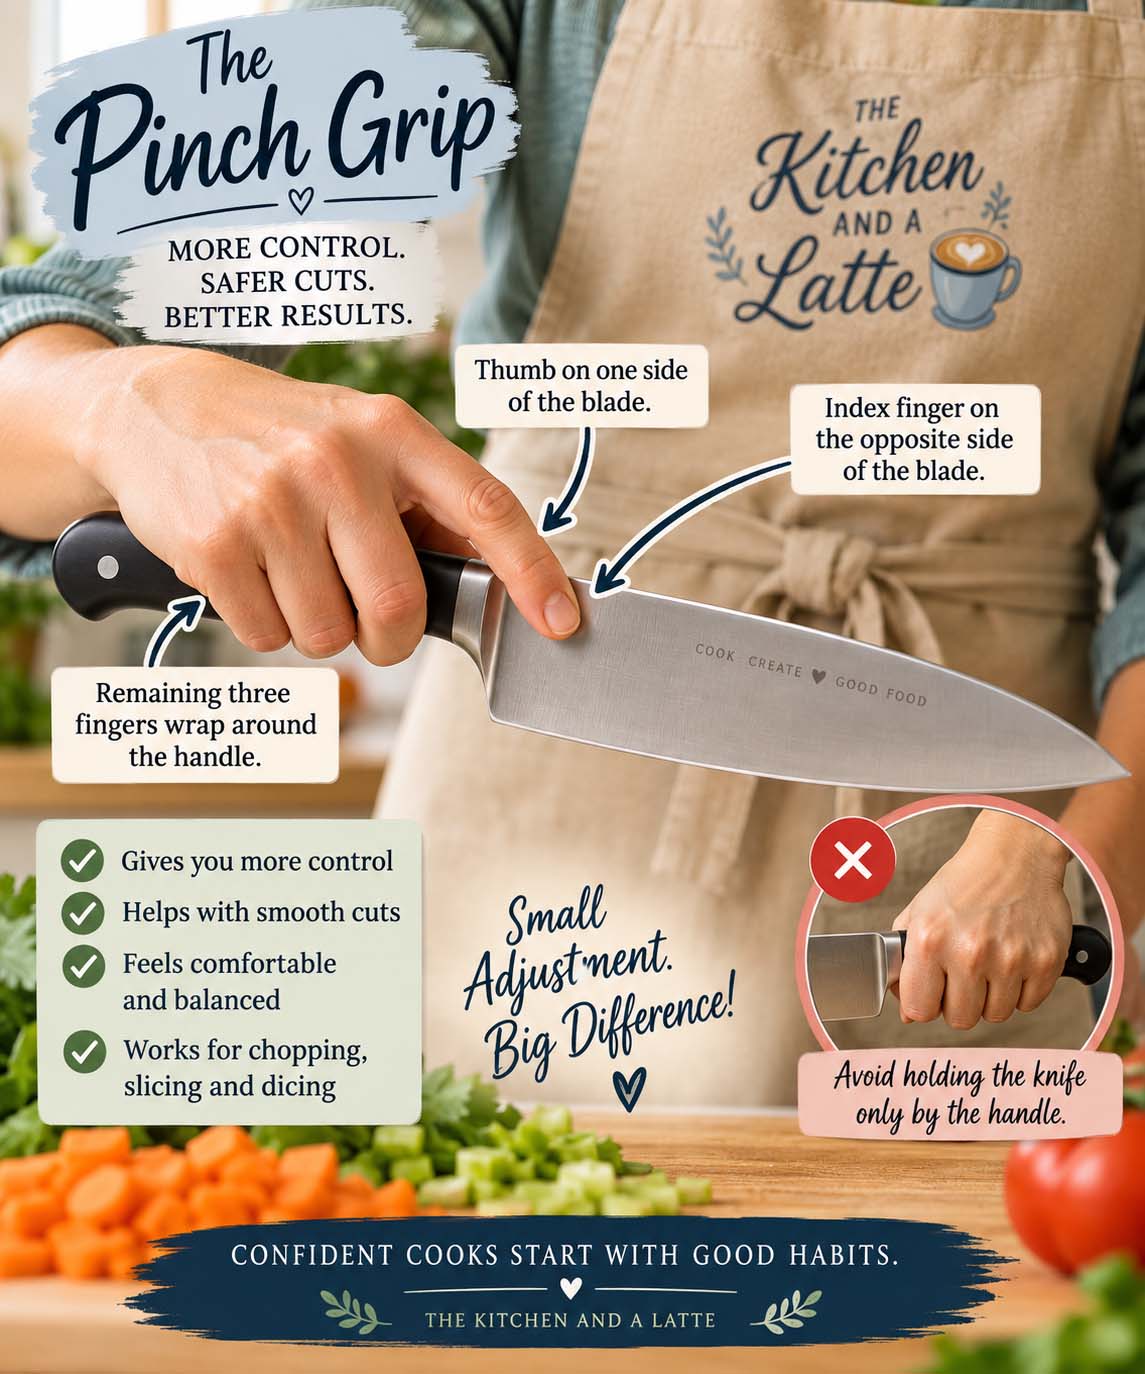
Many beginners instinctively wrap their entire hand around the knife handle. While you can certainly cut this way, you’ll usually have better control by using what’s called a pinch grip.
To use a pinch grip:
- Place your thumb on one side of the blade, just in front of the handle.
- Place the side of your index finger on the opposite side of the blade.
- Wrap your remaining three fingers comfortably around the handle.
You’re gently “pinching” the blade between your thumb and index finger.
Don’t squeeze tightly. Your grip should be secure but comfortable.
Why Use a Pinch Grip?
Holding the knife closer to the blade gives you more control over where the knife goes.
Think about trying to write while holding a pencil all the way at the eraser. You could do it, but controlling the tip would be much harder.
The same idea applies to your chef’s knife.
Holding it closer to the blade gives you better control over your cuts.
Your Other Hand Has an Important Job Too
Your non-knife hand is your guiding hand.
Remember the claw grip from Chapter 2?
This is where you put it into practice.
Curl your fingertips underneath your hand while allowing your knuckles to rest against or very near the side of the blade. As you cut, your guiding hand slowly moves backward along the food.
Your fingertips stay tucked safely behind your knuckles.
Knife hand = controls the knife.
Guiding hand = controls the food.
Once those two hands learn to work together, cutting becomes much easier.
Learn the Rocking Motion
A chef’s knife has a slightly curved blade for a reason.
Instead of lifting the entire knife straight up and down for every cut, you can use a gentle rocking motion.
Keep the tip of the knife near the cutting board while lifting the heel of the knife slightly. Bring the blade down and forward through the food, then repeat.
The movement should feel smooth rather than forceful.
This technique works especially well when chopping vegetables and herbs.
Don’t Force the Rocking Motion
Not every food or knife requires the same cutting motion.
Sometimes you’ll slice forward or backward through an ingredient instead. Other times you’ll make a more direct downward cut.
The goal isn’t to force every ingredient into one technique. It’s to learn how your knife moves through different foods while maintaining control.
Chopping vs. Slicing
You’ll see the words chop and slice constantly in recipes, but they’re not quite the same thing.
Chopping generally uses repeated cuts to divide food into smaller pieces. The pieces don’t always need to be perfectly uniform.
Slicing creates thinner, more even pieces by moving the knife smoothly through the ingredient.
For example, you might:
- Chop an onion for soup.
- Slice a tomato for a sandwich.
- Chop parsley for a garnish.
- Slice a cucumber for a salad.
Don’t worry about perfection yet. We’ll get into specific knife cuts in the next chapter.
Keep the Food Stable
Never try to cut something that’s rolling around underneath your knife.
Round vegetables such as carrots, potatoes, and onions can move unexpectedly.
Whenever possible, create a flat surface first.
For example, if you’re cutting a potato, you can carefully slice off a small section and place the flat side against your cutting board. Now the potato has a stable base instead of rolling around.
A stable ingredient gives you much more control.
Use the Right Amount of Pressure
If you find yourself pressing extremely hard to get through an ingredient, stop.
You may be using the wrong knife, your knife may be dull, or you may need a different cutting technique.
A sharp chef’s knife should move through most vegetables without requiring excessive force.
Let the blade do the work.
Don’t Scrape Your Knife Blade Across the Cutting Board
Here’s a habit many home cooks don’t realize can affect their knives.
After chopping vegetables, it’s tempting to turn the knife sideways and scrape everything across the cutting board.
Instead, use the spine of the knife or a bench scraper to move your ingredients.
Repeatedly dragging the sharp cutting edge across the board can dull it faster.
Practice Before You Worry About Speed
You don’t need to chop an onion in twelve seconds.
Seriously. Nobody is timing dinner. 😄
Start slowly and concentrate on:
- Keeping your fingertips tucked away.
- Maintaining a comfortable grip.
- Making controlled movements.
- Keeping the ingredient stable.
- Creating reasonably even pieces.
As these movements become familiar, you’ll naturally become faster.
Pro Tip 💡
Practice with easy-to-handle vegetables. A cucumber, zucchini, or carrot is a great place to start. Practice making slow, even slices while concentrating on your knife grip and guiding hand rather than speed.
Quick Practice Exercise
Grab a cucumber and place it on a stable cutting board.
Practice this sequence:
Pinch grip → claw grip → slow slice → move your guiding hand → slice again.
Try to make 10 slices that are roughly the same thickness.
Don’t worry if they aren’t perfect. Look at them when you’re finished and see whether your cuts became more consistent as you practiced.
That’s how knife skills develop: one cucumber at a time.
Coming Up Next
You’ve learned how to choose a knife, use it safely, hold it correctly, and control it while cutting.
Now we get to the fun part.
In Chapter 4: Basic Knife Cuts Every Home Cook Should Learn, we’ll cover chopping, slicing, dicing, mincing, and julienne, along with why cutting ingredients into similar sizes can actually help your food cook better.
Chapter 4: Basic Knife Cuts Every Home Cook Should Learn
Once you’re comfortable holding your knife and keeping your fingers safely out of the way, it’s time to learn some basic knife cuts.
You may see words like chop, dice, mince, slice, and julienne in recipes. They can sound more complicated than they really are.
You don’t need culinary-school-perfect cuts to make a great dinner. For home cooking, the most important thing is understanding what the recipe is asking you to do and trying to make your pieces relatively similar in size.
Why?
Because similar-sized pieces cook at roughly the same rate.
If half of your potatoes are tiny and the other half are huge, the small pieces may be falling apart before the larger ones are tender.
Let’s look at the basic cuts you’ll use most often.
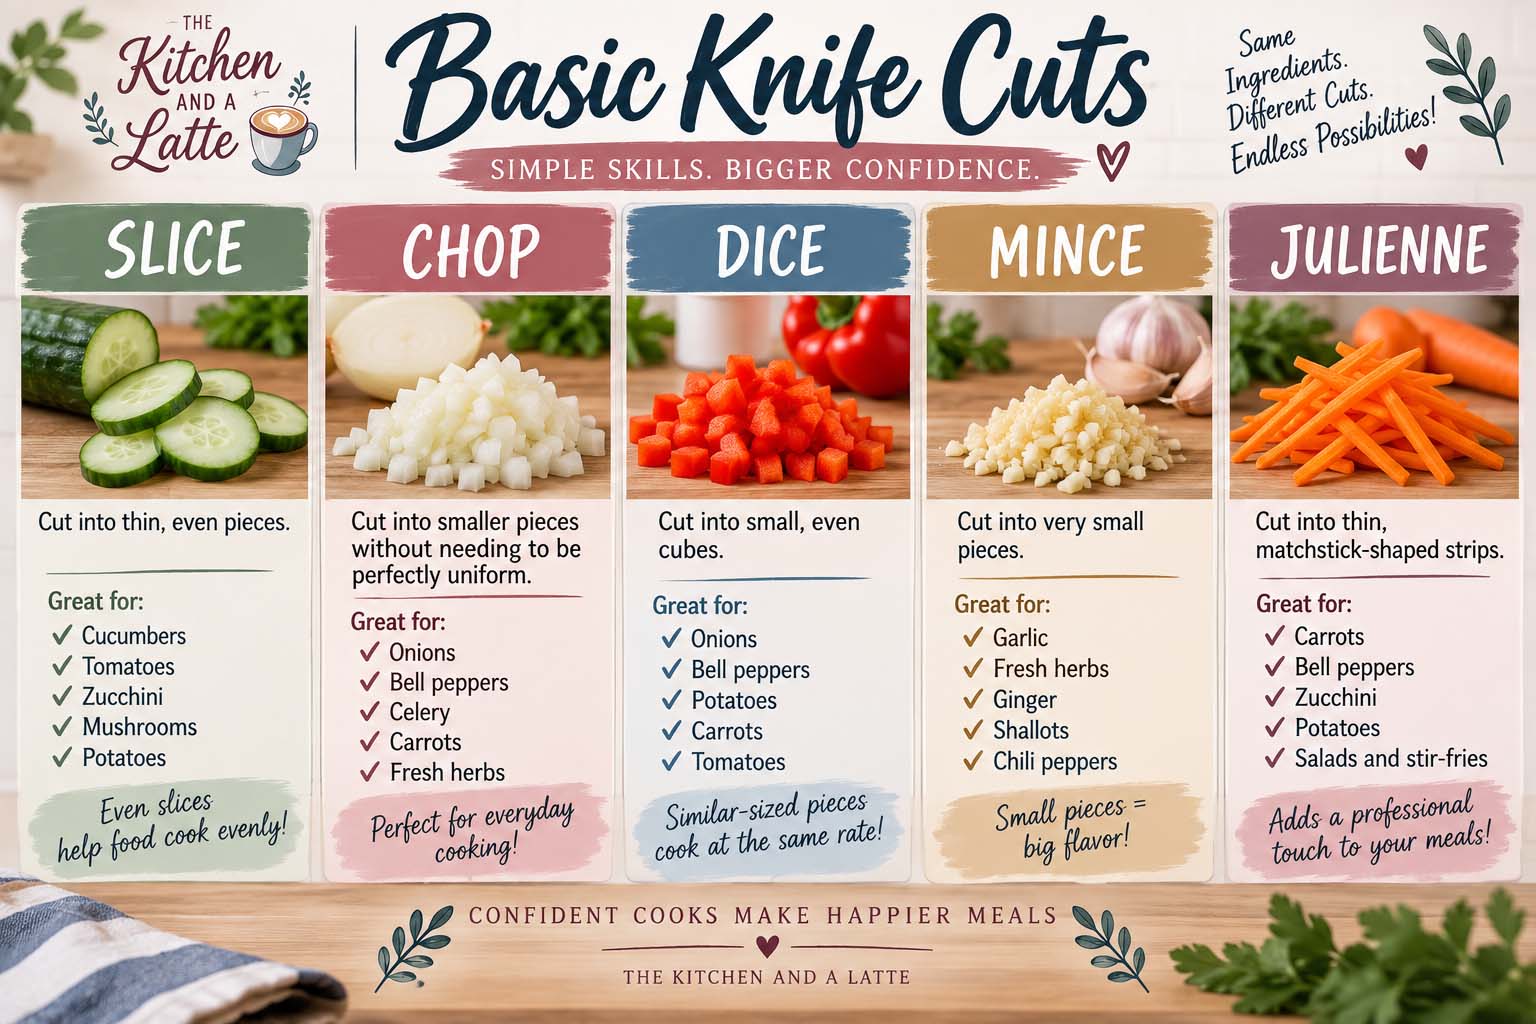
Chopping
Chopping is probably the knife skill you’ll use most often.
When a recipe tells you to chop something, it generally means cutting it into smaller pieces without worrying about making every piece exactly the same size.
You might chop:
- Onions for soup
- Carrots for stew
- Bell peppers for fajitas
- Celery for stuffing
- Fresh herbs for a recipe
Your pieces should still be reasonably similar in size, but they don’t have to look perfect.
When a Recipe Says “Roughly Chop”
This gives you even more freedom.
A rough chop means cutting an ingredient into manageable pieces without worrying much about uniformity.
You’ll often see this when ingredients will eventually be blended, pureed, strained, or cooked for a long time.
Beginner tip: Don’t spend ten minutes trying to make every chopped carrot identical. Close enough really is close enough.
Slicing
Slicing means cutting an ingredient into relatively thin, flat pieces.
You might slice:
- Tomatoes for sandwiches
- Cucumbers for salads
- Zucchini for cooking
- Mushrooms
- Potatoes
- Fruit
Try to keep the slices approximately the same thickness so they cook evenly.
When slicing something round, make sure the ingredient is stable before you begin. If necessary, create a flat surface first so it can’t roll underneath your knife.
Dicing
Dicing means cutting food into small cubes.
You’ll often dice:
- Onions
- Bell peppers
- Tomatoes
- Potatoes
- Carrots
Recipes may occasionally specify small, medium, or large dice.
You don’t need to pull out a ruler.
For beginner home cooking, simply understand that a small dice means small cubes and a large dice means larger cubes.
The important thing is keeping the pieces reasonably consistent.
An Easy Way To Dice
The basic idea is:
Slices → strips → cubes
First cut the ingredient into slices. Then cut those slices into strips. Finally, cut across the strips to create cubes.
Once you understand that pattern, dicing becomes much less intimidating.
Mincing
Mincing means cutting an ingredient into very small pieces.
Garlic is probably the ingredient you’ll mince most often, but you may also mince:
- Fresh herbs
- Ginger
- Shallots
- Chili peppers
For herbs, you can gather them into a small pile and carefully move your knife through them several times until they’re finely chopped.
For garlic, chop it into smaller pieces and continue cutting until the pieces are very fine.
And no, every microscopic piece of garlic does not need to be identical. Dinner will survive.
Julienne
Here’s the fancy-sounding one.
Julienne simply means cutting food into thin, matchstick-shaped pieces.
You’ll often see this technique used for:
- Carrots
- Bell peppers
- Zucchini
- Potatoes
Start by creating flat pieces, cut those into thin slices, and then cut the slices into narrow strips.
Julienned vegetables are useful for salads, stir-fries, garnishes, and dishes where you want vegetables to cook quickly.
Don’t worry about making restaurant-perfect matchsticks. At this stage, you’re learning the technique.
Why Does the Size of Your Cut Matter?
Knife cuts aren’t just about making food look pretty.
The size of an ingredient affects how quickly it cooks.
Imagine roasting a tray of potatoes.
One potato piece is tiny.
Another is twice its size.
Another looks like half a potato wandered onto the baking sheet and decided to stay. 🥔
By the time that giant piece cooks through, your smallest pieces may be overcooked.
More consistent cuts mean more consistent cooking.
That’s why developing basic knife skills can actually make you a better cook.
Don’t Sacrifice Safety for Perfect Cuts
Uniform pieces are helpful.
Your fingers are considerably more important.
If you’re struggling to create a certain cut, slow down. Reposition the ingredient. Make sure it has a stable surface and start again.
There is absolutely no prize for the world’s fastest diced onion.
Accuracy will improve naturally as you practice.
Pro Tips 💡
- Create a flat surface first. Stable ingredients are easier and safer to cut.
- Start larger. It’s easier to cut something smaller than to repair a piece you’ve accidentally cut too small.
- Keep your claw grip. Don’t abandon your safety techniques just because you’re concentrating on the shape of the food.
- Think about cooking time. Smaller pieces generally cook faster than larger ones.
- Practice during normal meal prep. You don’t need a separate knife-skills training session. Practice while making dinner.
Quick Practice Exercise
For this chapter, grab a vegetable such as a carrot, zucchini, or bell pepper.
Try creating three different cuts:
Slices → Dice → Julienne
Place a few examples of each next to one another.
They don’t need to be perfect. You’re simply teaching yourself to recognize and create different shapes.
Take a look at your pieces when you’re finished.
Are they reasonably similar in size?
If so, you’re doing exactly what you need to do.
Kitchen Confidence Check
Before moving on, make sure you understand the difference between:
Chop: Cut into smaller pieces.
Slice: Cut into thin, relatively even pieces.
Dice: Cut into cubes.
Mince: Cut very finely.
Julienne: Cut into thin matchstick-shaped strips.
You don’t have to memorize culinary measurements or produce flawless restaurant cuts. You just need to understand what these terms mean when you encounter them in a recipe.
Coming Up Next
You now know how to choose a knife, use it safely, hold it correctly, and make the basic cuts you’ll encounter in everyday recipes.
There’s one final piece of the puzzle:
Taking care of your knives.
In Chapter 5: How to Care for Your Kitchen Knives, we’ll cover washing and storing your knives, keeping them sharp, the difference between honing and sharpening, and a few common habits that can shorten the life of a good knife.
Chapter 5: How to Care for Your Kitchen Knives
You’ve learned which knives you need, how to use them safely, how to hold them correctly, and how to make basic cuts. There’s just one more skill every beginner cook should learn: how to take care of your knives.
A good kitchen knife can last for years when it’s cared for properly. Even better, keeping your knives in good condition makes them easier and safer to use.
Fortunately, knife care doesn’t have to be complicated.
Wash Your Knives by Hand
Even if your knife says it’s dishwasher safe, washing a good kitchen knife by hand is usually the better choice.
Dishwashers expose knives to high heat, strong detergents, and contact with other utensils. Over time, this can damage the blade, handle, or cutting edge.
Instead:
- Wash your knife with warm water, dish soap, and a soft sponge or cloth.
- Keep the sharp edge pointed away from your hand while cleaning it.
- Rinse thoroughly.
- Dry the knife immediately.
Don’t toss your knife into the sink and tell yourself you’ll deal with it later.
Besides potentially damaging the knife, a blade hidden underneath dishes or soapy water can become a serious safety hazard.
Dry Your Knives Right Away
After washing your knife, dry it thoroughly with a clean towel.
Don’t leave it sitting wet on the counter or in a drying rack for hours.
Moisture can eventually cause staining, corrosion, or rust on some knife blades.
Once it’s clean and dry, put it away.
Simple enough!
Store Knives Safely
Please don’t toss a sharp chef’s knife loose into your utensil drawer.
Not only can the blade become damaged from banging against other utensils, but reaching into a drawer full of exposed blades isn’t exactly an adventure your fingers need. 😬
Better storage options include:
- A knife block
- A magnetic knife strip
- In-drawer knife storage
- Individual blade guards
Whatever method you choose, the goal is the same: protect the blade and protect your hands.
Use the Right Cutting Board
Your cutting board affects your knife more than you might realize.
Wood and quality plastic cutting boards are generally good choices for everyday knife work because they aren’t excessively hard on the blade.
Try to avoid routinely cutting directly on surfaces such as:
- Glass
- Granite
- Marble
- Ceramic plates
- Your countertop
Hard surfaces can dull a knife surprisingly quickly.
And yes, sometimes it’s tempting to slice that sandwich directly on the plate.
Grab the cutting board. Your knife will thank you.
What’s the Difference Between Honing and Sharpening?
These two terms are often used interchangeably, but they’re actually different.
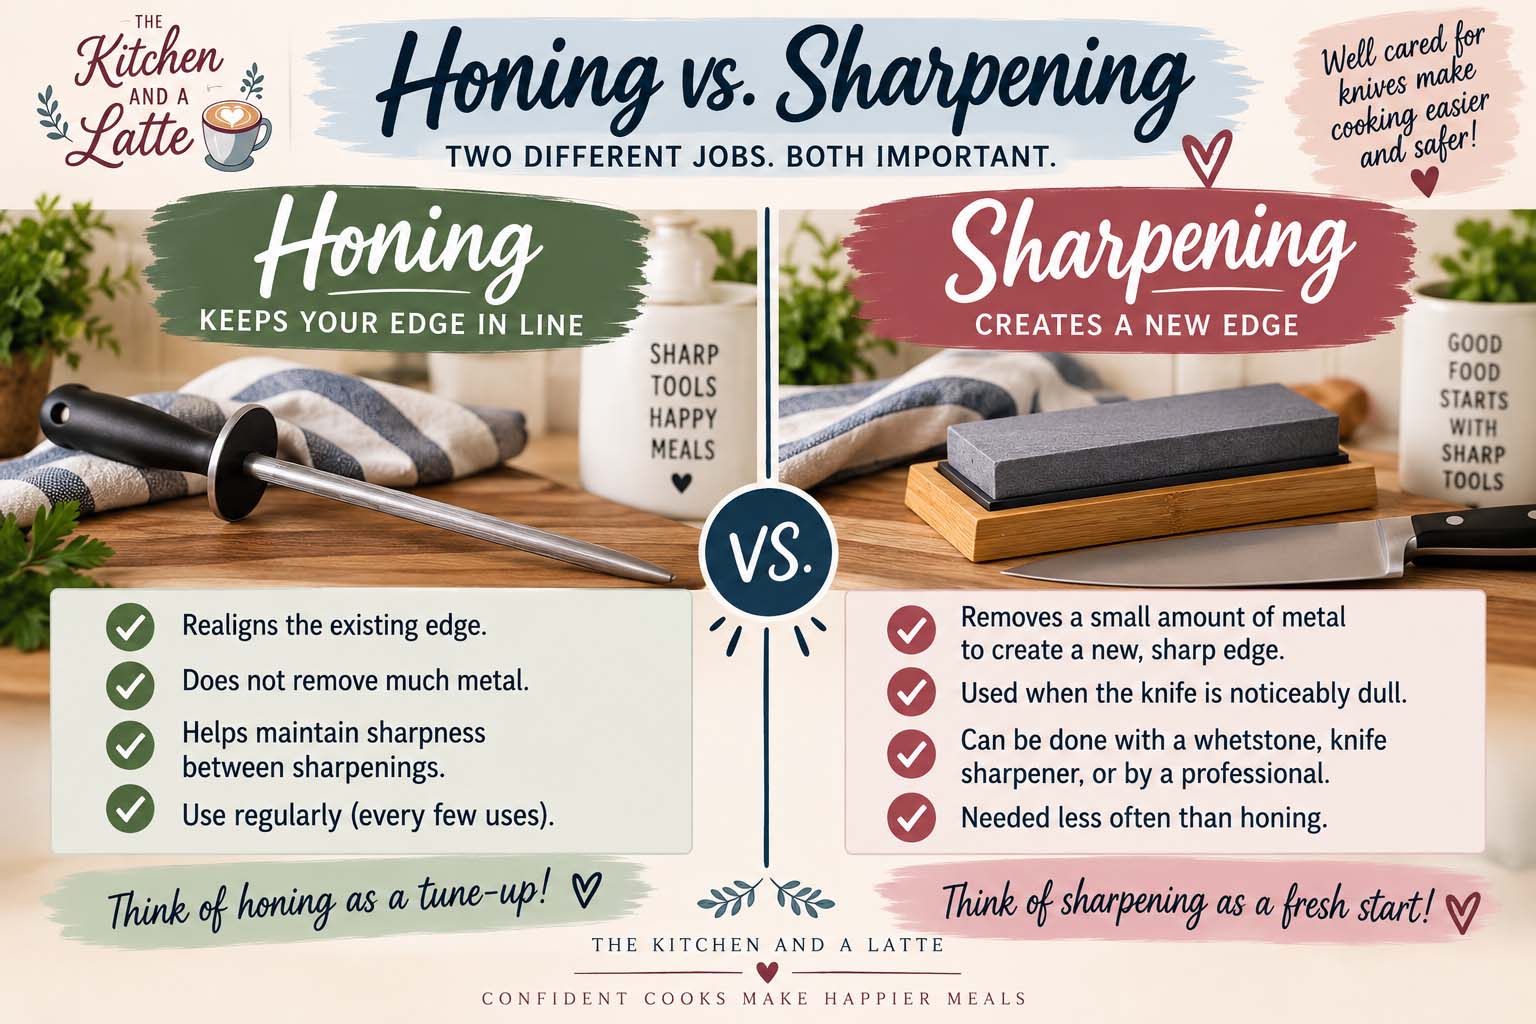
Honing
As you use a knife, the very fine edge of the blade can gradually move slightly out of alignment.
A honing rod helps realign that edge.
Honing doesn’t remove much metal from the knife. Instead, it helps maintain the existing edge between sharpenings.
Think of it as routine maintenance.
Sharpening
Sharpening actually removes a small amount of metal from the blade to create a new, sharp edge.
This can be done using:
- A whetstone
- Certain knife sharpeners
- A professional sharpening service
Sharpening doesn’t need to happen every time you use your knife.
How often you’ll need it depends on the knife, how frequently you cook, what surfaces you cut on, and how well you maintain the blade.
How Do You Know When Your Knife Needs Sharpening?
Your knife will usually give you clues.
You may notice that it:
- Struggles to slice through a tomato skin.
- Crushes delicate foods instead of cutting them.
- Requires noticeably more pressure than it used to.
- Slips off ingredients instead of biting cleanly into them.
If your knife suddenly feels harder to use, don’t compensate by pushing harder.
It may simply need attention.
Remember what we learned earlier: a properly sharpened knife gives you better control than a dull one.
Don’t Use Your Knife for Jobs It Wasn’t Designed to Do
Your chef’s knife is incredibly versatile.
It is not, however, a screwdriver, can opener, pry bar, or frozen-food chisel. 😂
Avoid using the blade to:
- Open cans or packages.
- Pry apart frozen foods.
- Twist open lids.
- Cut through bones unless the knife is designed for it.
- Hack through extremely hard frozen ingredients.
Using a knife for the wrong job can chip or damage the blade and potentially cause an injury.
Use the right tool for the task.
Take Care of the Cutting Edge
Remember our tip from Chapter 3 about moving chopped ingredients?
Try not to drag the sharp edge of your knife sideways across the cutting board.
Instead, flip the knife over and use the spine of the blade to move ingredients, or use a bench scraper.
It’s a tiny habit that can help your knife stay sharper longer.
You Don’t Need Expensive Knives
Here’s one final reminder that’s especially important for beginner cooks.
You do not need a $300 chef’s knife to become a good cook.
A reasonably priced knife that:
- Feels comfortable in your hand,
- Holds a decent edge,
- Is kept sharp,
- Is stored properly,
- And is cared for correctly
can serve you extremely well.
Learning how to use your knife matters far more than having the fanciest knife in the kitchen.
Pro Tips 💡
Never use a kitchen knife as a substitute for another tool.
Wash your knives by hand instead of leaving them in the dishwasher.
Dry knives immediately after washing.
Use wood or plastic cutting boards instead of glass or stone.
Store knives so the cutting edge is protected.
Pay attention when your knife starts requiring more pressure to cut.
Quick Practice Exercise
Take a look at the knives you already own.
Ask yourself:
Are they stored safely?
Does your chef’s knife still cut easily?
Are you using a knife-friendly cutting board?
Do any of your knives need sharpening?
You don’t need to buy anything today. Simply knowing the condition of your tools is part of becoming a more confident home cook.
Kitchen Confidence Check
By now, you should know:
Honing maintains and realigns an existing edge.
Sharpening creates a new cutting edge by removing a small amount of material.
Knives should be washed carefully by hand and dried promptly.
Wood and plastic cutting boards are generally easier on knife edges than glass or stone.
Knives should be stored somewhere that protects both the blade and your hands.
And with that…
You Finished the Main Lesson! 🎉
You started this lesson by learning which knives belong in a beginner’s kitchen. Then you learned how to protect your fingers, hold and control a chef’s knife, make common knife cuts, and properly care for your knives.
You don’t need to master everything immediately.
The next time you make dinner, choose one skill from this lesson and practice it. Maybe you’ll concentrate on your claw grip while chopping an onion. Maybe you’ll practice making evenly sized carrot pieces. Maybe you’ll finally rescue that chef’s knife that’s been rattling around loose in your utensil drawer.
Every meal gives you another chance to practice.
And every time you practice, using a knife will feel a little less intimidating and a lot more natural.
Pro Tips for Better Knife Skills
You don’t need years of experience to become more comfortable with a kitchen knife. A few simple habits can make cutting safer, easier, and much less intimidating.
- Slow down. Speed develops naturally as your knife skills improve. Focus on control first.
- Keep your knife sharp. A sharp knife requires less pressure and gives you better control.
- Use the claw grip. Keep those fingertips tucked safely behind your knuckles.
- Secure your cutting board. If it slides, place a damp towel or non-slip mat underneath it.
- Create a flat surface. Round ingredients are much easier to control when they can’t roll.
- Use the right knife. Don’t struggle through a job with a knife that wasn’t designed for it.
- Keep your workspace clean. Move scraps and finished ingredients out of the way as you work.
- Practice consistency before speed. Evenly sized ingredients cook more evenly.
- Never try to catch a falling knife. Step back and let it fall.
- Take care of your knives. Proper washing, storage, honing, and sharpening will make them easier to use.
Common Knife Mistakes Beginners Make
Learning knife skills takes practice, and almost every beginner makes a few mistakes along the way. Knowing what to watch for can help you correct them before they become habits.
Mistake: Trying to Cut Too Fast
Why it’s a problem: Speed can reduce control and increase the chance of slipping.
How to fix it: Slow down and concentrate on your grip, guiding hand, and consistent cuts. Speed will come later.
Mistake: Cutting With Fingers Flat
Why it’s a problem: Your fingertips are exposed to the blade.
How to fix it: Use the claw grip and keep your fingertips curled safely underneath your hand.
Mistake: Using a Sliding Cutting Board
Why it’s a problem: The entire cutting surface can move while you’re holding a sharp knife.
How to fix it: Place a damp towel or non-slip mat underneath the board.
Mistake: Using a Dull Knife
Why it’s a problem: A dull knife requires more pressure and can slip unexpectedly.
How to fix it: Maintain your knife and have it sharpened when it no longer cuts cleanly.
Mistake: Cutting Round Foods Without Stabilizing Them
Why it’s a problem: Potatoes, onions, carrots, and other round foods can roll while you’re cutting.
How to fix it: When appropriate, create a flat surface and place that side against the cutting board before continuing.
Mistake: Scraping Food With the Cutting Edge
Why it’s a problem: Dragging the sharp edge sideways across the board can dull it faster.
How to fix it: Use the spine of your knife or a bench scraper to move chopped ingredients.
Mistake: Leaving Knives in the Sink
Why it’s a problem: Someone can reach into the water without realizing a sharp knife is underneath.
How to fix it: Wash knives separately, dry them immediately, and put them away.
Quick Recap
You covered a lot in this lesson, but you don’t have to remember everything at once.
Here are the most important things to take with you:
Choose the right knife. A chef’s knife, paring knife, and serrated knife will handle most beginner cooking tasks.
Keep your cutting board stable. A damp towel underneath can help prevent slipping.
Protect your fingertips. Use the claw grip when holding food.
Hold your knife comfortably. A pinch grip can give you greater control over a chef’s knife.
Learn the basic cuts. Chop, slice, dice, mince, and julienne will appear frequently in recipes.
Aim for consistency, not perfection. Similar-sized pieces generally cook more evenly.
Keep your knives sharp and properly stored.
And most importantly:
Control before speed.
You are learning to cook, not auditioning for a televised chopping competition. 😉
Frequently Asked Questions About Knife Safety and Knife Skills
What is the safest way to hold food while cutting?
Use the claw grip. Curl your fingertips underneath your hand and use your knuckles as a guide for the side of the knife. This helps keep your fingertips away from the blade.
Is a sharp knife really safer than a dull knife?
A properly sharpened knife can be easier to control because it requires less pressure to cut through food. A dull knife may require additional force and can slip unexpectedly. A sharp knife can still cause serious injury, however, so proper technique is always important.
What knife should a beginner cook buy first?
A comfortable chef’s knife is usually the most versatile first knife. It can handle chopping, slicing, dicing, mincing, and many other everyday kitchen tasks.
What size chef’s knife is best for beginners?
An 8-inch chef’s knife is a common choice because it’s versatile enough for many kitchen tasks. Comfort matters more than choosing a particular size, though, so use a knife that feels manageable and balanced in your hand.
Why does my cutting board slide?
Smooth countertops can allow cutting boards to move during use. Placing a damp towel or non-slip mat underneath the board can help keep it secure.
What’s the difference between chopping and dicing?
Chopping means cutting food into smaller pieces without requiring perfectly uniform shapes. Dicing generally means cutting food into roughly cube-shaped pieces of a more consistent size.
What’s the difference between honing and sharpening a knife?
Honing helps realign the knife’s existing edge, while sharpening removes a small amount of material to create a new cutting edge.
Can kitchen knives go in the dishwasher?
Even when a manufacturer labels a knife dishwasher safe, handwashing is often gentler on the knife. Wash it carefully with dish soap and water, dry it promptly, and store it safely.
What cutting boards are best for kitchen knives?
Wood and quality plastic cutting boards are common knife-friendly choices. Very hard surfaces such as glass, stone, and ceramic can dull a knife more quickly.
How can I get faster at chopping?
Practice slowly first. Concentrate on your grip, claw position, knife movement, and consistent cuts. As those movements become familiar, you’ll naturally become faster.
Homework: Practice Your Knife Skills
This homework comes with dinner. 🍽️
Choose one recipe you’re already planning to make that requires some vegetable prep.
While preparing it, practice three things:
- Your pinch grip while holding your chef’s knife.
- Your claw grip with your guiding hand.
- Making reasonably consistent cuts.
Don’t time yourself.
Don’t worry about making restaurant-perfect vegetables.
Instead, notice whether you feel more comfortable controlling the knife than you did before this lesson.
For some extra practice, choose a carrot, cucumber, zucchini, bell pepper, or potato and practice making slices, diced pieces, and julienne strips.
That’s it.
You just completed your beginner knife-skills practice!
Congratulations! You Completed Lesson 3 🎉
You now have another important kitchen skill under your belt.
You’ve learned how to choose the right knife, work safely, hold a chef’s knife, protect your fingertips, make common knife cuts, and care for your knives.
Keep practicing these techniques during everyday meal prep. You don’t need a separate practice session every day. Every onion you chop and every carrot you slice gives you another opportunity to become more comfortable.
The goal isn’t to become the fastest person with a knife.
It’s to become a safe, confident home cook.
Next Lesson: Measuring Ingredients Correctly
Next up in The Kitchen and a Latte Cooking School, we’re tackling something that seems incredibly simple but can completely change a recipe:
Measuring ingredients correctly.
We’ll learn the difference between dry and liquid measuring cups, how to properly measure flour, when measurements need to be exact, common measuring mistakes, and why baking requires a little more precision than making a pot of soup.