Instant Pot Chocolate Swirl Cheesecake
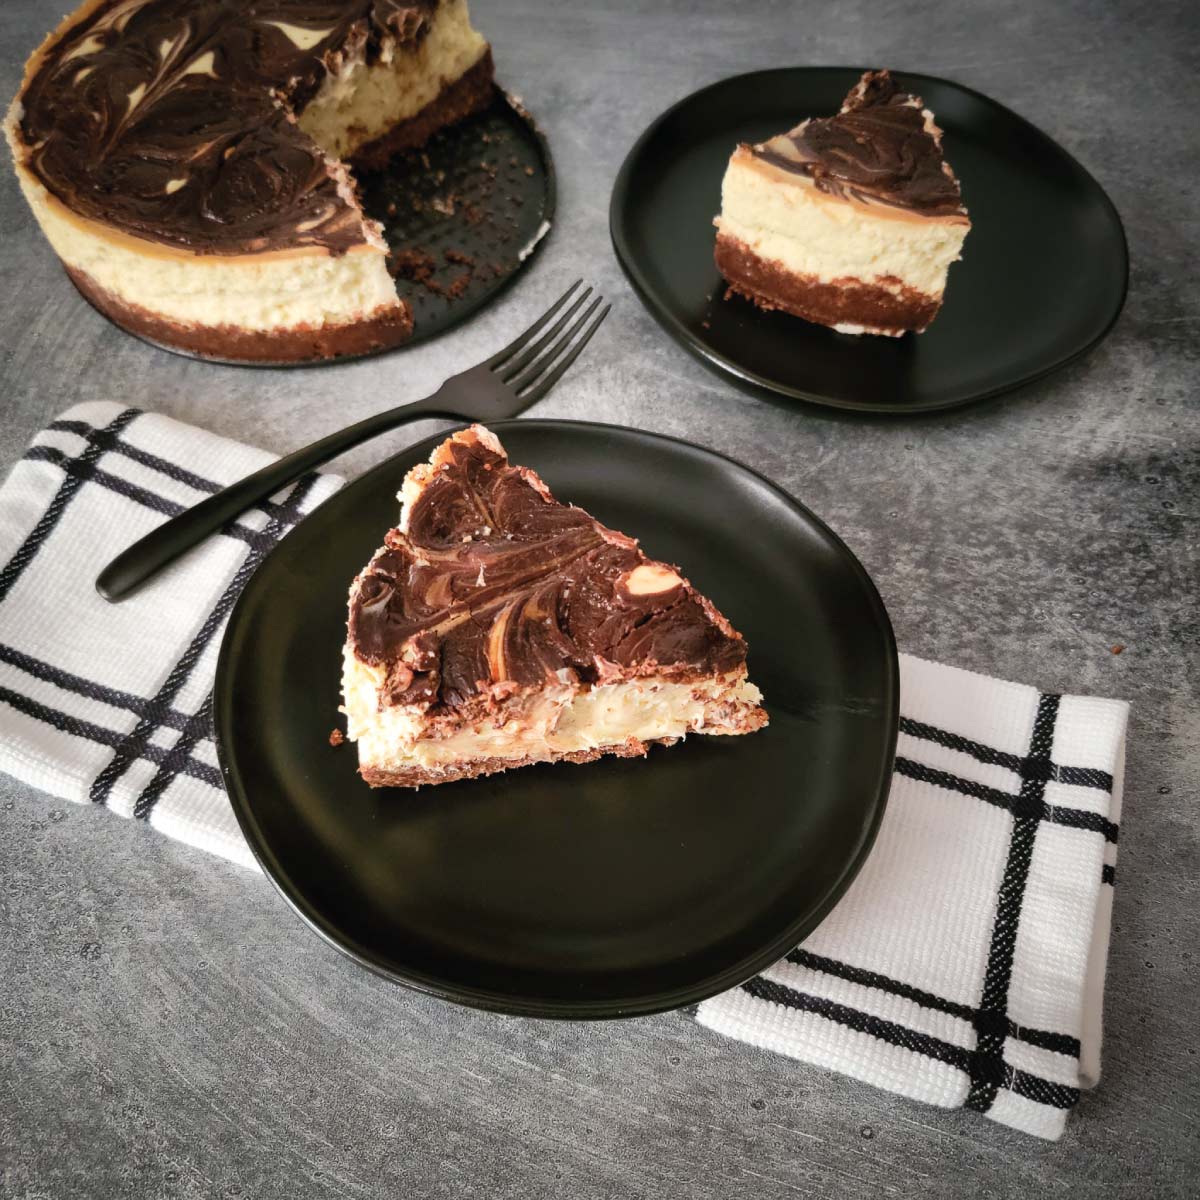
Easy to make, Instant Pot chocolate swirl cheesecake is the ultimate dessert for the cheesecake lover! The swirl makes a beautiful and delicious dessert that will impress your guests.

When I first purchased my Instant Pot, I had no idea I would be making desserts in it. But it turns out that it makes an amazing cheesecake! We love cheesecake whether it is baked, in the Instant Pot or a no bake like our no bake strawberry blueberry cheesecake.
We use it to make a few different desserts, but this and our Instant Pot pumpkin cheesecake are the favorites.
This easy chocolate swirl cheesecake is made with a graham cracker crust that we add cocoa to, but you can substitute it with chocolate graham crackers. The swirls are made with melted chocolate chips making it a beautiful swirl layer on top.
Are you ready for a great treat? Grab a cup of homemade hot chocolate and get ready to enjoy this cake!
We use affiliate links on our site. This post may contain affiliate links and we may earn a commission on qualifying purchases. Please see our affiliate disclosure for more details.
Ingredients
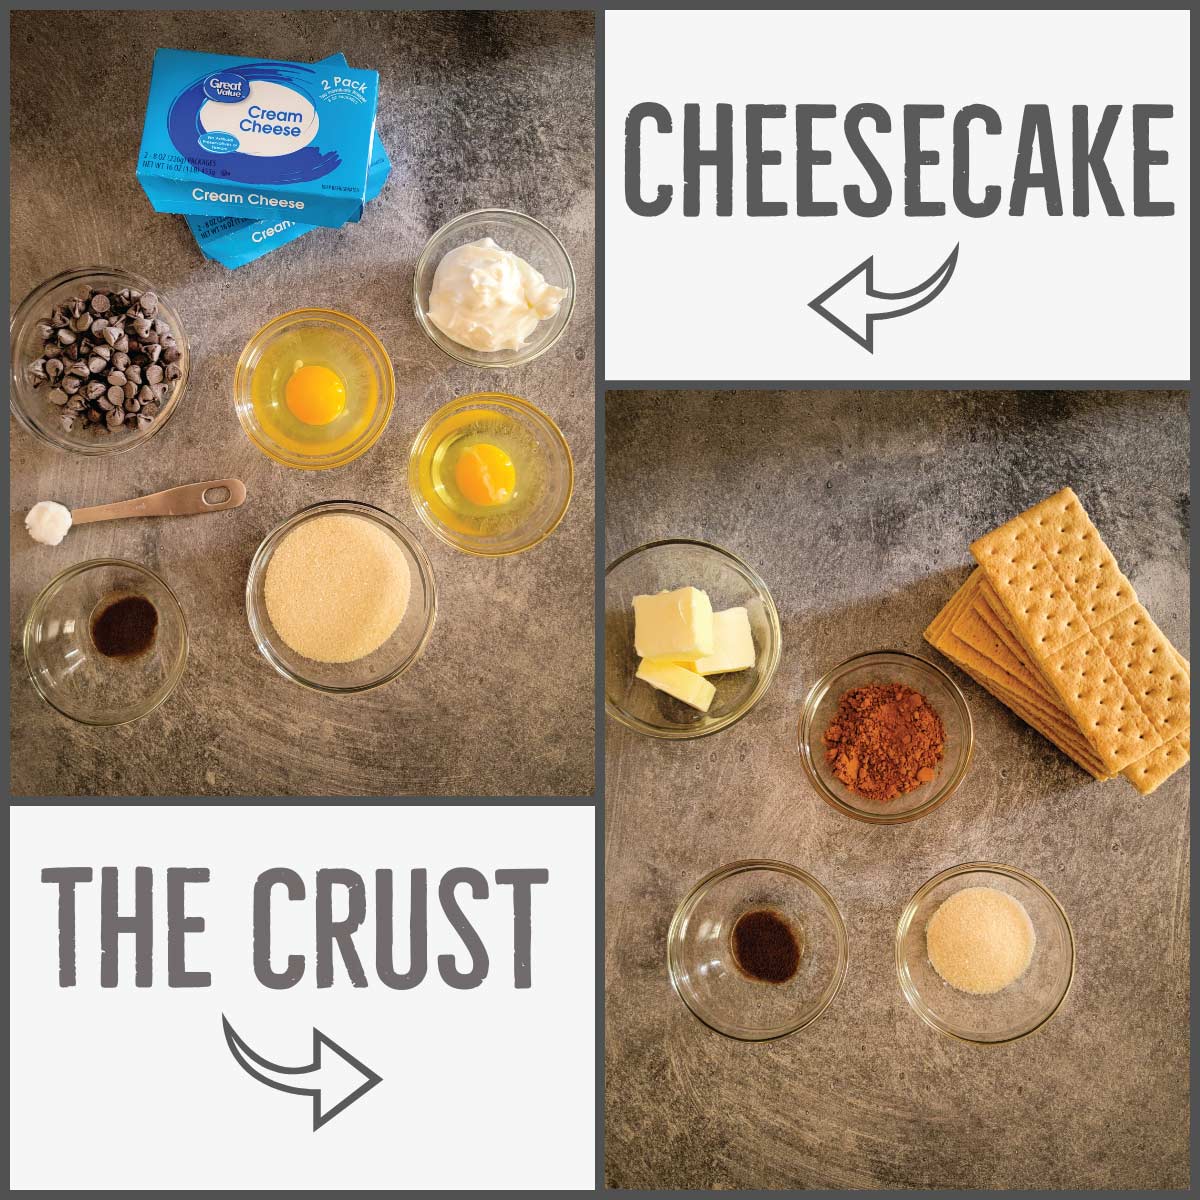
For the crust
Graham crackers – Honey is what we recommend here, but you can use chocolate graham crackers and leave out the cocoa powder.
Cocoa powder – The chocolate in the crust adds the perfect flavor to the cheesecake, but you can leave it out if you prefer a regular crust. Also leave out if using chocolate graham crackers.
Espresso powder – Optional for enhanced flavor.
Sugar – Recommended to add the right amount of sweetness to the crust, but you can leave out if you prefer.
The cheesecake
Cream cheese – Use the block cream cheese, not whipped or spreadable. We use full fat here and recommend only using full fat cream cheese.
Yogurt – Plain Greek yogurt is best, but you can use regular plain yogurt. You can also substitute with sour cream.
Eggs – No substitutions recommended.
Vanilla extract – No substitutions recommended.
Sugar – Granulated sugar.
For the swirl
Chocolate chips – Use your favorite, but we prefer milk chocolate for the Instant Pot chocolate swirl cheesecake.
Coconut oil – We used refined for this so there was no coconut flavor in the chocolate. It is used to melt the chocolate chips, shortening can be used in it’s place.
Espresso powder – Optional but recommended for enhanced flavor.
Making the easy chocolate swirl cheesecake
This is an easy Instant Pot cheesecake recipe to make.
Note that the swirl layer is made with chocolate chips so it is a slightly different texture then if there was chocolate batter swirled in. It adds a beautiful top to the cheesecake along with a nice chocolate flavor.
I also highly recommend using espresso powder as noted in the recipe to help enhance the chocolate flavor, but it is optional if you do not have it or struggle to find it. We get ours at Walmart, but our other supermarkets do not have it.
Before you do anything else:
Most important step is to take the cream cheese, yogurt and eggs out of the fridge. Let them sit on the counter until they are room temperature. I take my cream cheese out for about 2 hours usually. Eggs and yogurt (or sour cream) for about 1 hour.
The texture of your Instant Pot chocolate swirl cheesecake depends on this step! You will most likely end up with a lumpy texture if you do not follow this. The cream cheese will be lumpy if any ingredient are too cold.
Making the crust
As you can see, our crumbs are all different sizes and the flavor is amazing. No worries if your crumbs are not all perfect tiny specs 🙂
We like to use honey graham crackers here and add in the espresso powder and cocoa for flavoring, but you could also get chocolate graham crackers. Chocolate sandwich cookies make another great chocolate crust!
Graham cracker crust
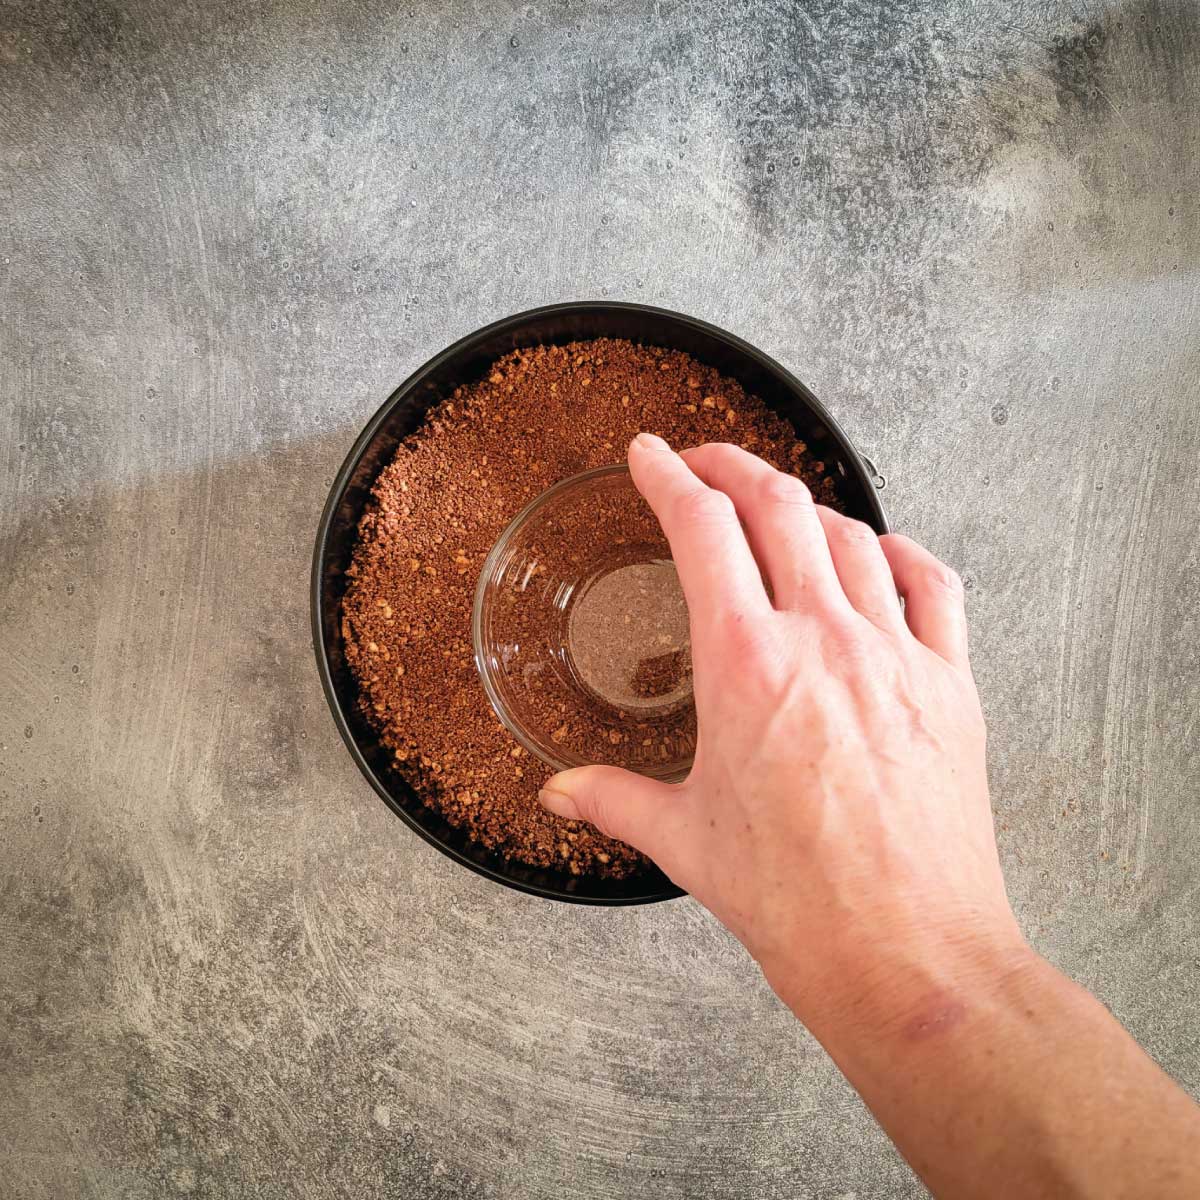
Use 10 full crackers and crush into tiny pieces. We put them in a bag and use a rolling pin, but you can also pulse them in a food processor. Pour the crumbs into a bowl for mixing.
Add in the cocoa powder, espresso powder and sugar. Stir with a fork until combined well. Pour in the melted butter and mix until the graham cracker pieces are evenly coated. Press down into the bottom of the 7 inch springform pan as tight as you can pack it down. I use a glass jar to squish it down. The springform pan got lined with parchment paper on the bottom to make it easier to serve.
We prefer to use the graham cracker crust for our chocolate swirl cheesecake, but the cookie crust is delicious too! Just a little sweeter.
Cookie crust
Chocolate sandwich cookies are a great crust. You need regular for this tho, not double stuff (as much as I love double stuff!) It will take 15 cookies crushed. This can be done the same way as the crackers, either in a bag with a rolling pin or a food processor.
Add in the melted butter and stir until the cookie crumbs are evenly coated with butter. Pack it down into the bottom of the springform pan as tight as you can, using something like a cup or jar to pack it down.
The filling

This is a simple yet delicate process. As much as I love my stand mixer, you are best to use a hand mixer for this. You can use the stand mixer, but do be careful with mixing too much after adding the eggs. This goes for any cheesecake whether in the Instant Pot or baking, not just this chocolate swirl cheesecake.
Place the cream cheese in a mixing bowl and beat it with the hand mixer until smooth. This will be about 30 seconds on medium.
Add in the sugar next and mix for another 30 seconds. The yogurt and vanilla extract are next. Mix until the are just incorporated. We use either sour cream or plain yogurt in Instant Pot cheesecakes with similar results, so if you prefer (or have sour cream) you can use that in place of the yogurt.
The eggs are the delicate process. If you over whip them here, you will not have a good texture and will have too much air. I add them one at a time and mix for 5 seconds each. You will see here above that it is not perfectly combined but I finish mixing it carefully and slowly with my spatula before pouring it on top of the crust. This will help keep new air bubbles from getting into the batter and it will help get rid of ones in there already.
Pour over the crust and use a spatula, fork or spoon to carefully pop any air bubbles if you have any noticeable.
The chocolate swirl
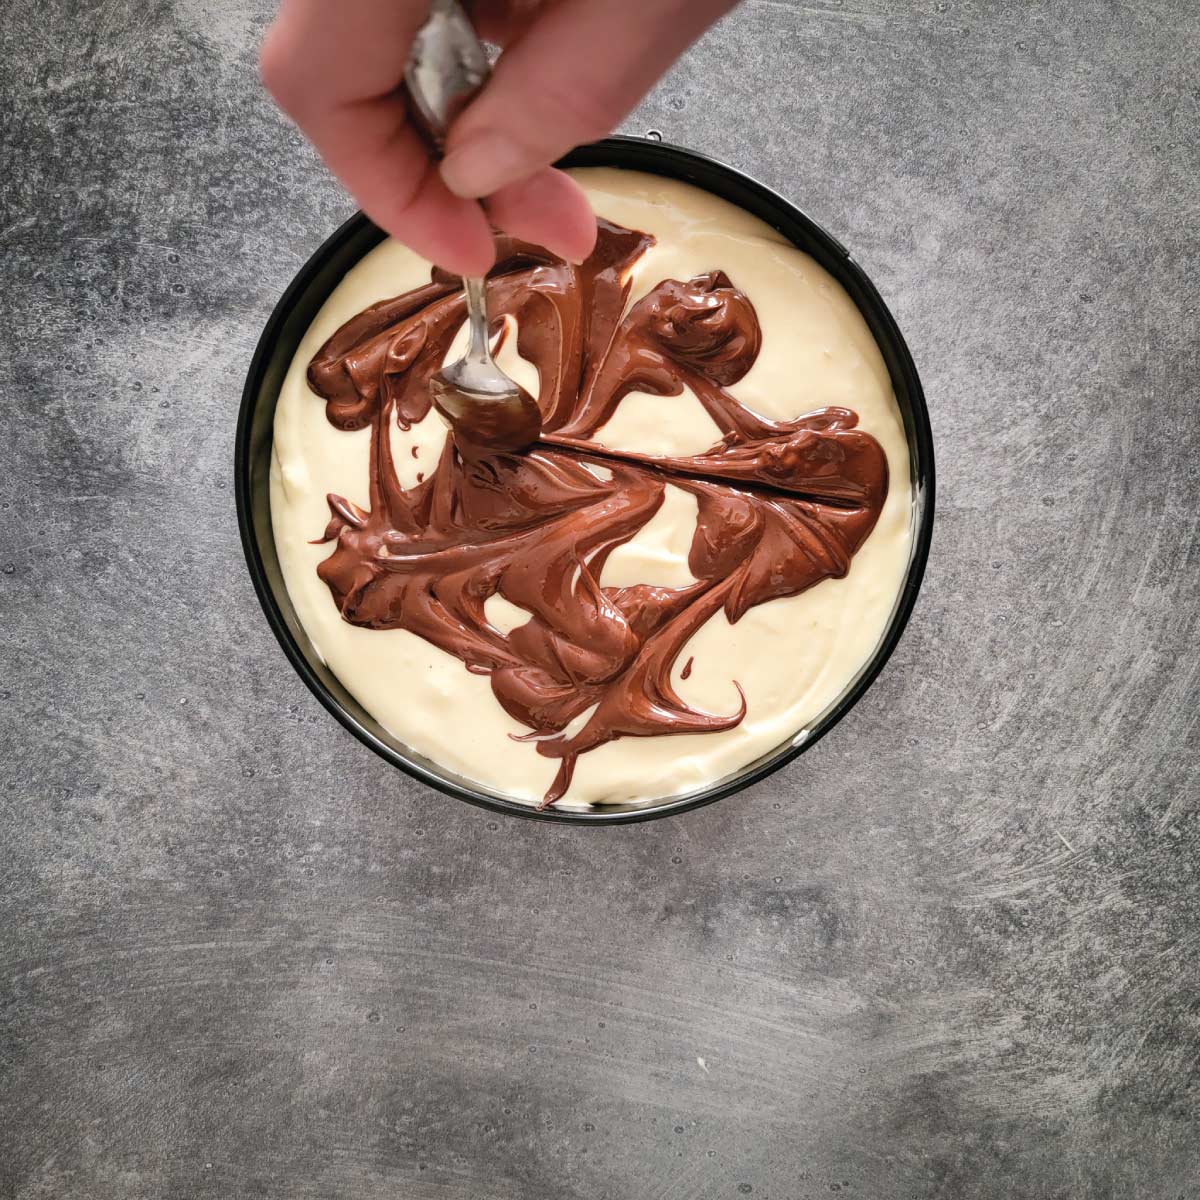
The best part of the easy chocolate swirl cheesecake is the swirl! This is a special process but it is easy. I don’t always use an oil to melt chocolate chips, but you do need something when adding espresso to it. I like to use refined coconut oil for this. It doesn’t have a flavor of any kind so it is perfect for melting. You can use shortening in it’s place.
Melt the oil/shortening in a pan. Add in the espresso powder and mix well. Now add in the chocolate chips, stirring often over medium low heat until they are just melted. Do not walk away while melting them. They go from perfect to scorched very quickly.
Drop into blobs on the top of the cheesecake and swirl the blobs around with a spatula, spoon or even a fork. You can make nice designs or just swirl it around with no pattern at all. It will look amazing either way!
Cooking
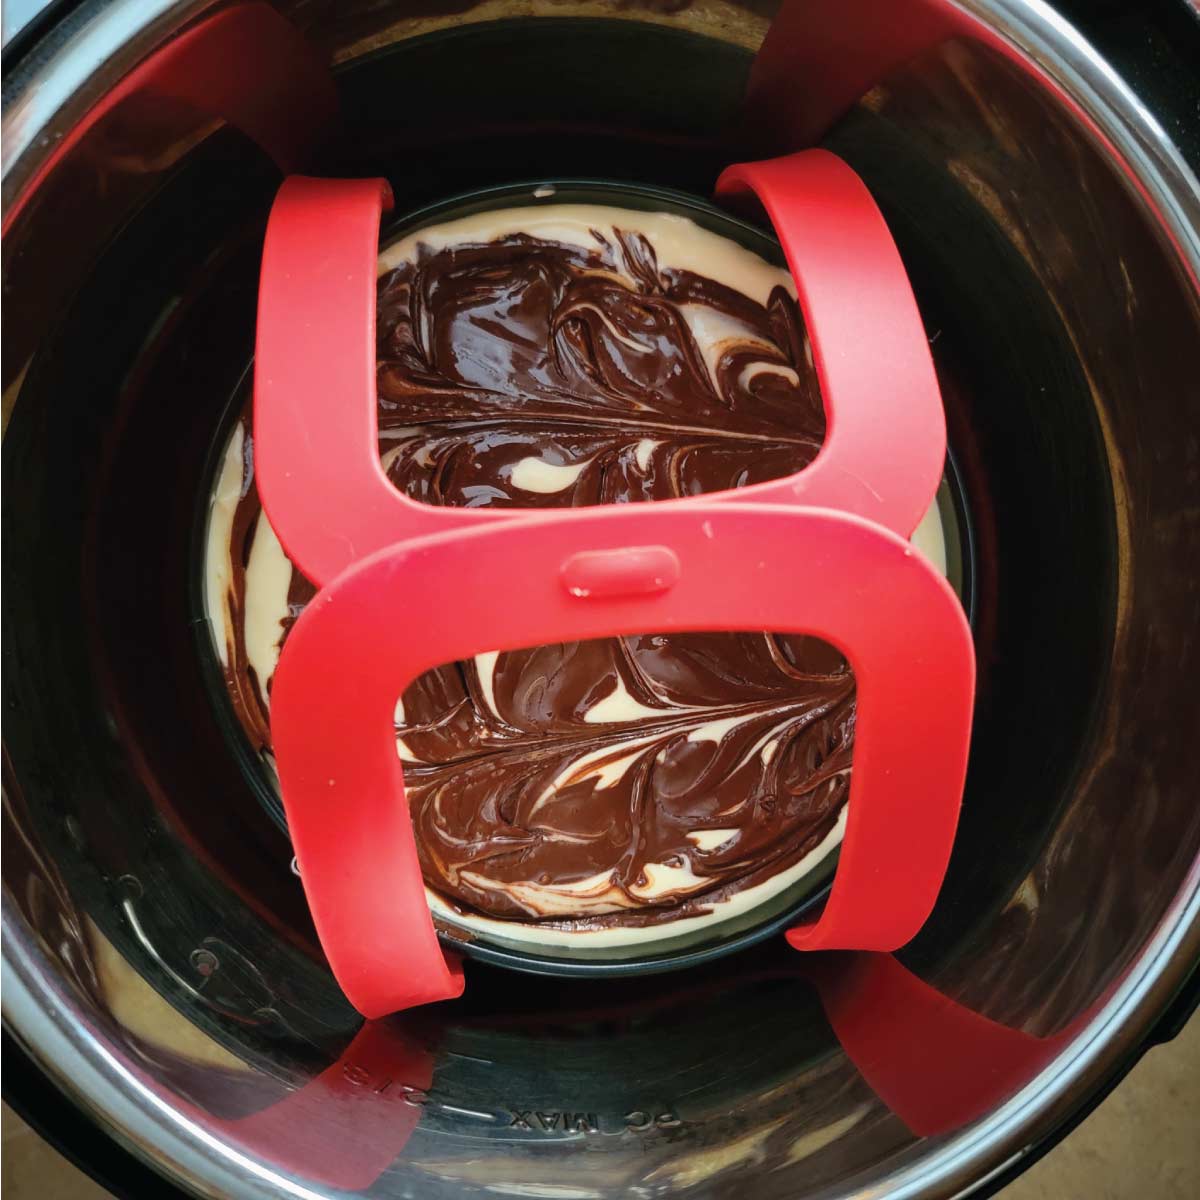
I put mine in the silicone sling accessory here, but you can also use the trivet and make a foil sling. With this silicone sling, you do not use the trivet. With a foil sling you need to use the trivet.
Pour 1 cup of water into the bottom of your Instant Pot. If using the trivet, place that in and the cheesecake on top. If using the silicone sling, place it directly into the pot.
Close the lid and set the vent to sealing. Cook on high pressure for 27 minutes and then naturally release. Carefully remove the lid (there will be moisture on the lid.) Using a paper towel, carefully blot any moisture that has dripped onto the top of your cake.
Allow to cool on a metal rack on the counter for about an hour before placing in the fridge uncovered for at least 2 hours before covering. Cover after the 2 hours and allow it to chill for at least 4 hours total in the fridge, overnight is best for the best texture.
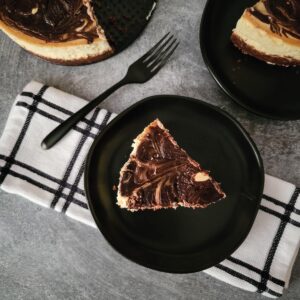
We enjoy our Instant Pot cheesecake with chocolate swirl served with some fresh homemade whipped cream. You can even make some chocolate whipped cream if you like a lot of chocolate!
Frequently asked questions
You can use a 6, 8 or even 10 quart with the recommended spring form pan and sling. It will not fit in the 3 quart tho.
You can, but it’s best to let it chill first. It firms up and the texture gets better as it sits in the fridge.
It will last about 4-5 days if properly stored in the fridge.
Yes you can freeze it after cooking! Be sure it has been completely chilled first – at least 4 hours. You can also freeze it in single serve slices. Thaw in the fridge before serving. It will last at least 3-4 months in the freezer if properly stored.
Equipment
These are the things we use to make the Instant Pot chocolate swirl cheesecake. As an Amazon affiliate we may earn a commission if you make a purchase through one of our links. This is at no extra cost to you and helps to keep the recipes free, thank you for your support!
Springform pan – This is the one we have and love for our Instant Pot cheesecakes! It fits in the 6 and 8 quart. Any bigger then the 7 inch will not fit in the 6 quart.
Sling – This is the official Instant Pot sling. It fits in the 6 and 8 quart and we absolutely love it! It’s inexpensive and comes in handy for many things you want to make in your IP, especially cheesecakes.
6 quart or 8 quart Instant Pot – Either size is fine for this recipe, we have both sizes and use them both all the time.
Instant Pot Chocolate Swirl Cheesecake
Ingredients
Graham Cracker Crust
- 4 Tablespoons butter
- 10 graham crackers crushed into crumbs
- 2 Tablespoons cocoa powder unsweetened
- 1 Tablespoon sugar
- ¼ teaspoon espresso powder
The Filling
- 16 ounces cream cheese softened
- ½ cup sugar
- ¼ cup plain yogurt
- 1 teaspoon vanilla extract
- 2 eggs
The Chocolate Swirl
- ¼ teaspoon espresso powder
- 1 teaspoon coconut oil see notes
- ½ cup chocolate chips
Instructions
- First start out by taking your cream cheese out. It will need to sit out for probably close to 2 hours (depending on the temperature in your house) before being ready to mix. The yogurt (or sour cream) and eggs need to sit out about an hour before mixing.16 ounces cream cheese, ¼ cup plain yogurt, 2 eggs
Making the Crust
- Crush graham crackers into crumbs using either a food processor or a bag with a rolling pin.Add in the cocoa powder, sugar and espresso. Mix well to combine.10 graham crackers, 2 Tablespoons cocoa powder, 1 Tablespoon sugar, ¼ teaspoon espresso powder
- Melt the butter in a sauce pan. Pour the graham cracker crumb mix into butter and stir well.Pour into the springform pan. Optional – place a circle cut out of parchment paper on the bottom of the springform pan before adding the crust.4 Tablespoons butter
- Using something with a flat surface like a jar or cup, pack the crust mixture into the bottom of the spring form pan. Pack them down as best as you can.
Making the Filling
- Add the cream cheese to a mixing bowl. With a hand mixer, beat it for about 30 seconds or until it is smooth and creamy.16 ounces cream cheese
- Add in the sugar and beat again for about 20-30 seconds.½ cup sugar
- Next add in the vanilla extract and the yogurt. Beat until just incorporated.1 teaspoon vanilla extract, ¼ cup plain yogurt
- This is a delicate step. Add the eggs one at a time but only beat for about 5 seconds each time. It will not be fully mixed.Continue to carefully stir the mixture with a spatula, slowly until it is fully incorporated – doesn't take long.2 eggs
- Pour the filling over the crust and spread it evenly with a spatula.
The Chocolate Swirl
- Heat the oil up in a saucepan and add the espresso powder. Stir it well.1 teaspoon coconut oil, ¼ teaspoon espresso powder
- Pour the chocolate chips into the oil mix and stir often until they are just melted and like a thick syrup. Do not walk away while melting, there is a quick line between melted and scorched.½ cup chocolate chips
- Carefully drop blobs of the melted chocolate on top of the cheesecake and swirl around with a fork.
Cooking the Cheesecake
- I use a silicone sling, but you can use the trivet and a foil sling if you don't have the silicone one. To make a foil sling:Take a piece of foil that is about 20 inches long and fold it lengthwise 3 times, like folding a letter. So you now have a 20 inch sling that will be strong enough to take a cheesecake out of the Instant Pot.
- Place the spring form pan on the sling.
- Pour 1 cup of water into the Instant Pot. Add the trivet only if using a foil sling. The silicone sling has it's own built in trivet.
- Place the cheesecake into the Instant Pot and lock the lid. Set the vent to sealing.
- Hit manual/pressure cook (different models have different buttons) and set for 27 minutes.It will take around 7-10 minutes to build pressure.
- Allow to naturally release pressure when it is finished cooking which will take about 7-10 minutes.Carefully remove lid as there will be moisture on the lid.Once you remove your cheesecake, set it on a wire rack to cool for an hour on the counter. If there is any moisture puddles (this is normal), carefully blot it with a paper towel before cooling.
- Once it has cooled on the counter for about an hour, transfer it to the fridge to cool uncovered for at least 2 hours. Cover after 2 hours and allow it to sit in the fridge for at least 4 hours total, overnight is best for the best texture. Do not cover before letting it cool in the fridge, it creates excess moisture.Serve and enjoy!
lovely decadent dessert! pinned!
This is a completely new baking method to me but I see how great it works! Definitely worth a try!
Perfection! I’ve been looking for a new cheesecake recipe and love the chocolate swirls in this one. Delicious.
Cheesecake is one of my favorites but I’ve never tried it in my instant pot! This looks amazing
This is beautiful AND delicious! I love the simple ingredients. So yummy!!
I’ve yet to buy an instant pot, but recipes like this makes me want to run out and buy one today. This cheesecake looks amazing! Bonus that it cooks in such a short amount of time.
It came out just perfect. Easy and delicious! Absolutely loved it.
I would love to have such a delectable Cheesecake swirl! Thanks for sharing!
this cheesecake looks so good, glad it can be made in an insta-pot. Perfect dessert for our CNY celeb.
Cheesecake in instant pot!?!! Yes please!
Delicious and came out perfect! I’m going to make this again for valentines day.