Easy Peppermint Pinwheel Cookies
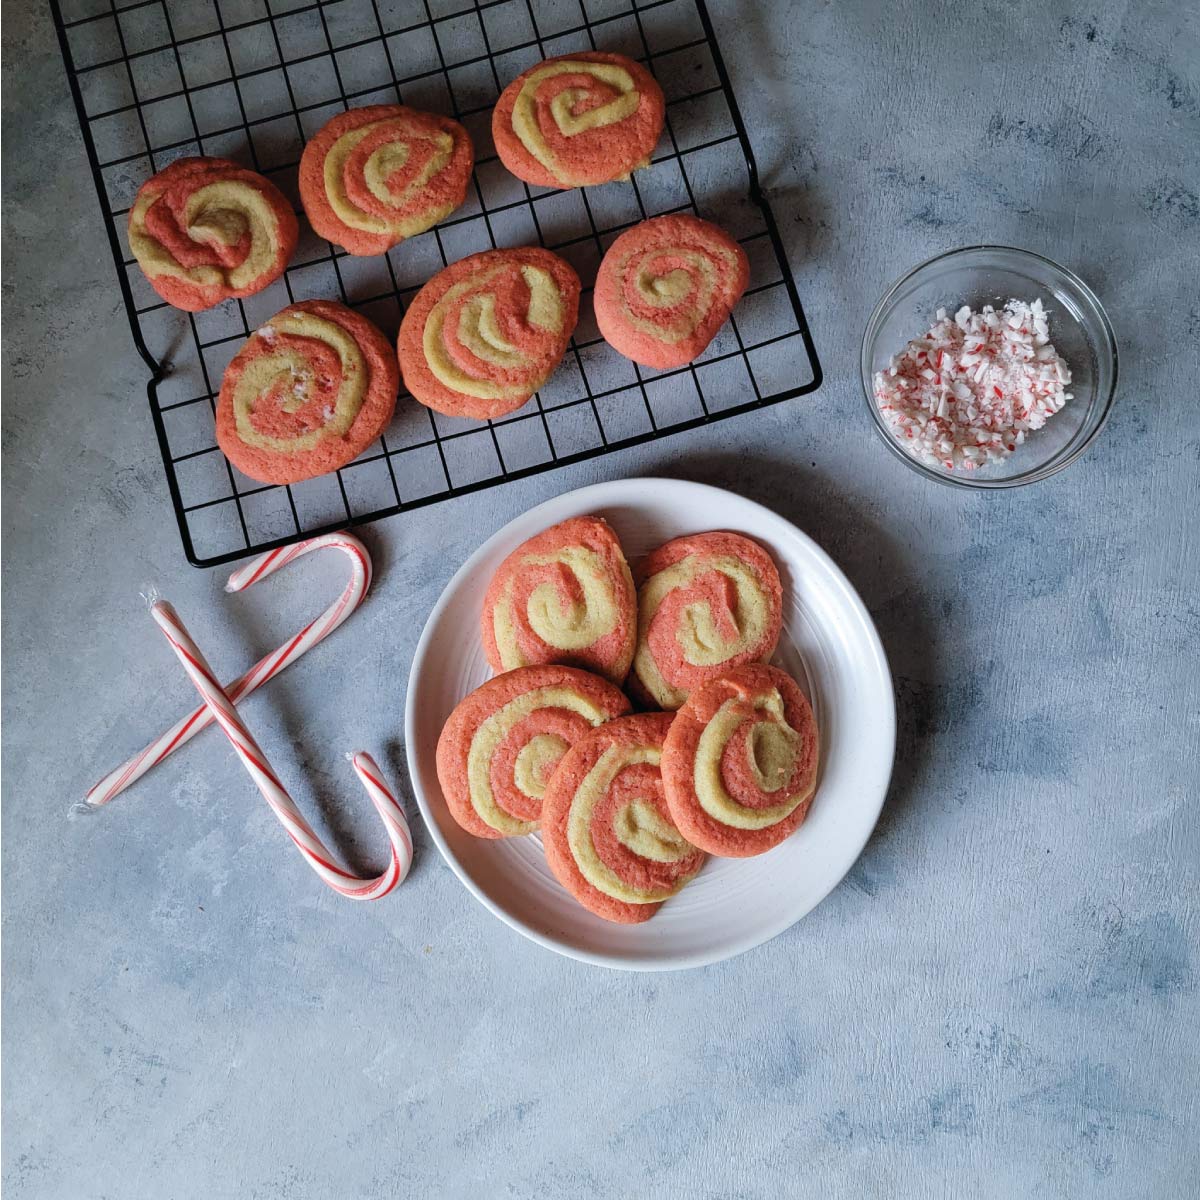
Peppermint pinwheel cookies are the perfect way to enjoy the flavors of the season. The have a sugar cookie texture with the taste of peppermint. Crushed candy canes can be used as a decoration, but they are optional.
What is one of your favorite traditions at Christmas? Here one of the many is baking cookies. I mean who doesn’t love cookies, right?
This is one of our favorite Christmas cookie recipes here because the peppermint flavor is just right. They are not overpowering, they have the perfect balance of flavor similar to our peppermint mocha cupcakes.
These peppermint cookies are easy to make and perfect for entertaining, gifting or just eating at home. I enjoy them with a cup of coffee topped with some homemade peppermint whipped cream.
Crushed candy canes make a great decoration if you are looking to add a bit of easy decorations. We quite often leave them plain, but the candy canes do add a nice look.
We use affiliate links on our site. This post may contain affiliate links and we may earn a commission on qualifying purchases. Please see our affiliate disclosure for more details.
Ingredients
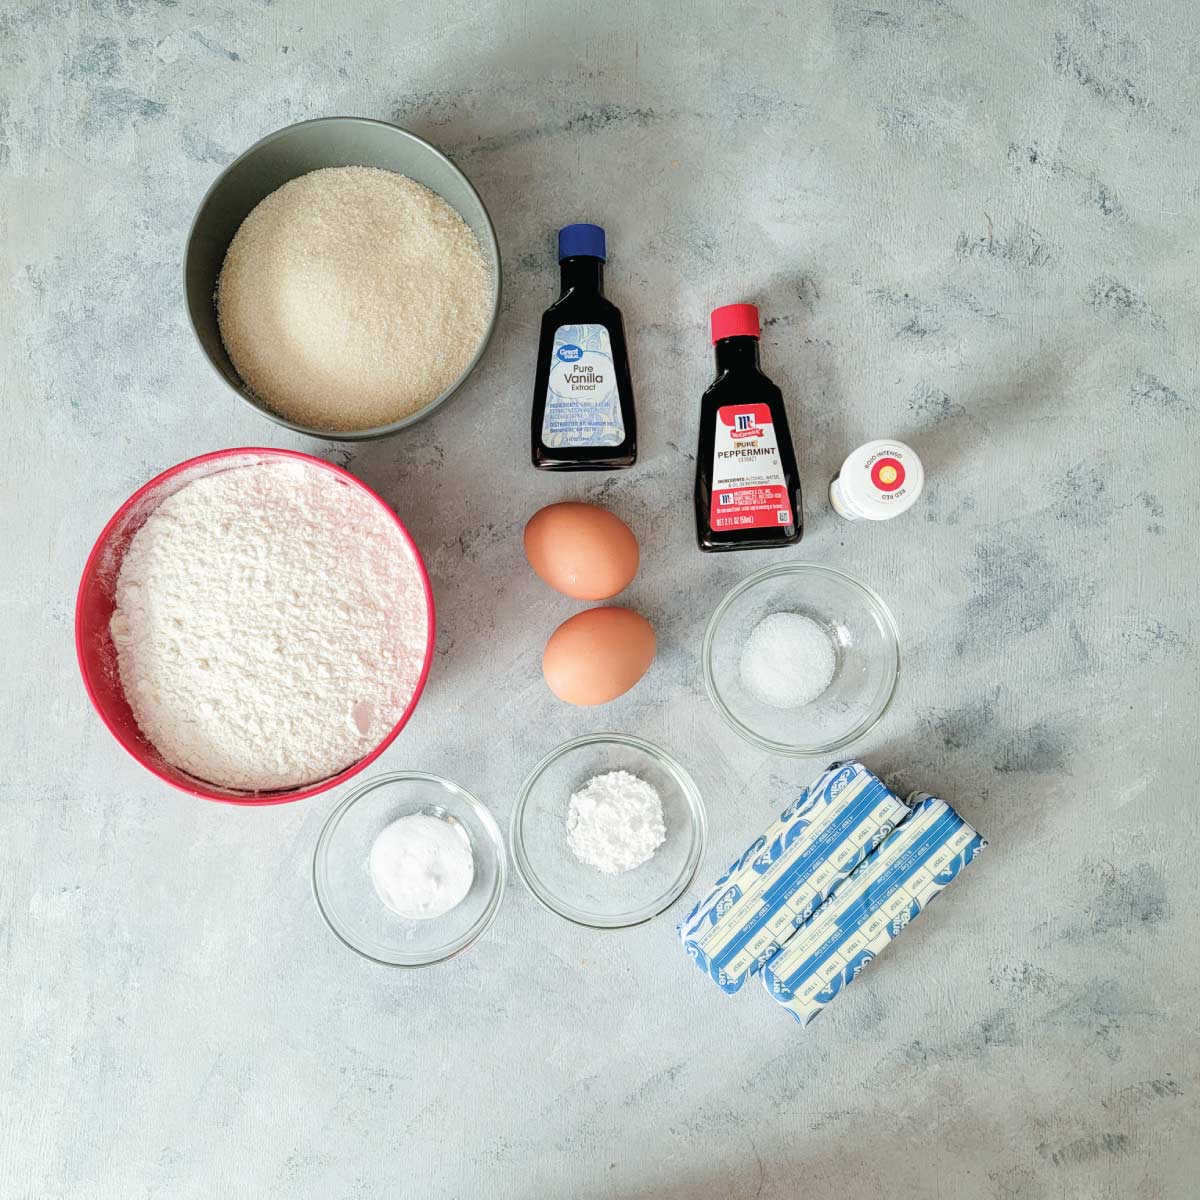
Sugar – Granulated sugar. We use Morena pure cane sugar (usually cheaper locally.) So if you notice the slightly brown tint in our sugar, this is why. White granulated or a pure cane sugar that is not coarse works perfect. Turbinado or any coarse sugar is not recommended here.
Flour – All purpose flour is what we used. We have not tested it with any other flour.
Eggs – No substitutions recommended.
Vanilla extract – No substitutions recommended.
Peppermint extract – No substitutions recommended. You can add more of the peppermint and less vanilla if you are looking for a more intense peppermint flavor.
Food coloring – This is optional if you want 2 colors or a pink cookie. We used red icing coloring here because it adds a more intense color, but you can use the regular food coloring you get in the spice isle at the store.
Salt – Table salt or fine sea salt (not coarse.)
Baking soda – No substitutions recommended.
Baking powder – No substitutions recommended.
Butter – Unsalted is recommended.
Crushed candy cane – Optional. If you add before baking, they will melt on top of the cookie. If you sprinkle just after they come out, it will add a nice decoration but also a little crunch. The crushed pieces should be pretty small so they are not too crunchy.
Making the 2 colors is optional. Peppermint extract is clear so we used red food coloring on half of the dough. We did here it to have pinwheels and it wouldn’t work if they were all one color. We feel it gives it more of a peppermint candy look to our cookie.
Do I have to make these peppermint cookies into pinwheels?
No you do not have to make them into pinwheels. The pinwheel is an easy way to roll them up and cut them out, but it’s not the only way to make them. This is how we make them because it reminds us of the little peppermint candies.
Another cute option is to make them into candy cane cookies! You can take small amounts of dough and roll them into thin strips. Twist the strips together and shape them like a candy cane.
You can roll the cookie dough out and cut them with cookie cutters as well. Please note that the cooking times may vary for different shapes.
Tips for making the cookies
Making the peppermint cookies is pretty easy, but here are some tips to help you with making them. Please note that I am at a very low altitude here so you may need to adjust accordingly.
The dough
Be sure your butter is softened at room temperature before making the cookies. Do not melt the butter, this will change the texture of the cookie.
In a small bowl whisk together the flour, baking soda, baking powder and salt. Set aside.
In the mixing bowl cream the butter and sugar on high speed for about 2 minutes. Then add the extracts (vanilla and peppermint) and eggs, mixing on high for about 1 minute after adding.
I like to use the stand mixer here for cookies, but you can also use a hand mixer as well.
Add in the dry ingredients and mix on low speed until they are mixed in.
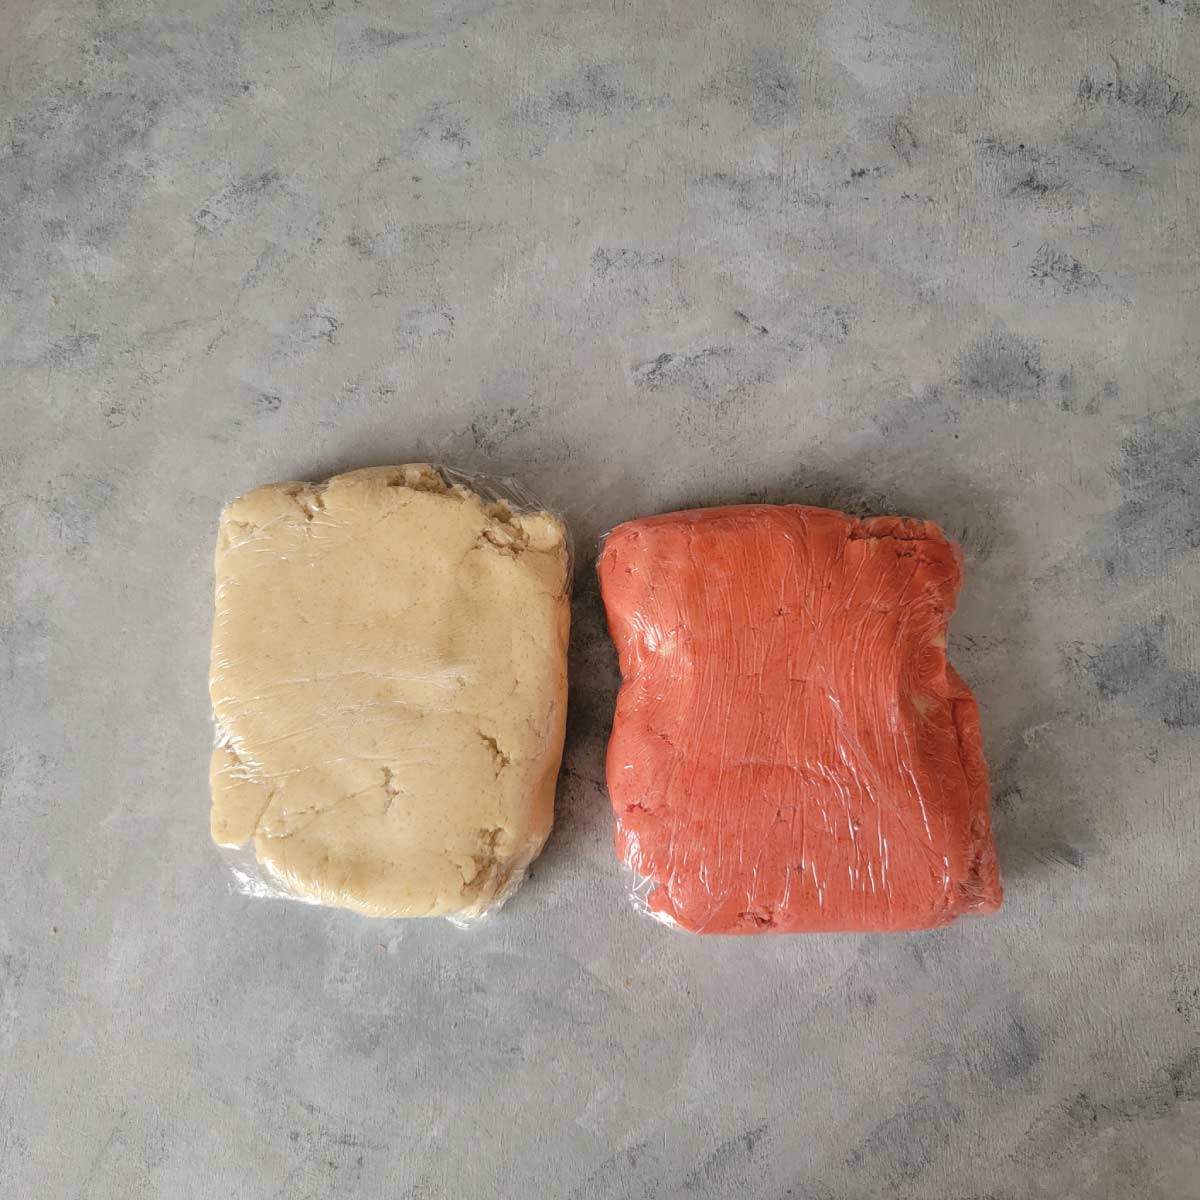
If doing 2 colors – Remove about half of the dough and add in food coloring. Amount will vary depending on which food coloring you are using and your desired shade. When baked they will be a little lighter pink then the batter. Mix on low until the coloring is mixed in. I would start with 9 drops of food coloring.
Divide dough into 4 sections – 2 pink and 2 without coloring. Wrap each in plastic wrap and refrigerate for at least an hour before rolling out.
Making pinwheel cookies
It is best to do these peppermint pinwheel cookies into 2 rolls – but 1 at a time. Take out one of the pink and one of the uncolored cookie dough sections.
Be sure that your surface is floured for rolling them out. They will stick to the surface without using flour.
Roll them both out into 2 even rectangles that are about an eighth to one quarter of an inch thick. The edges on your rolled dough do not have to be perfect, the imperfections will not show on your finished cookie.
If you see in this picture they are both close in size but not perfect.
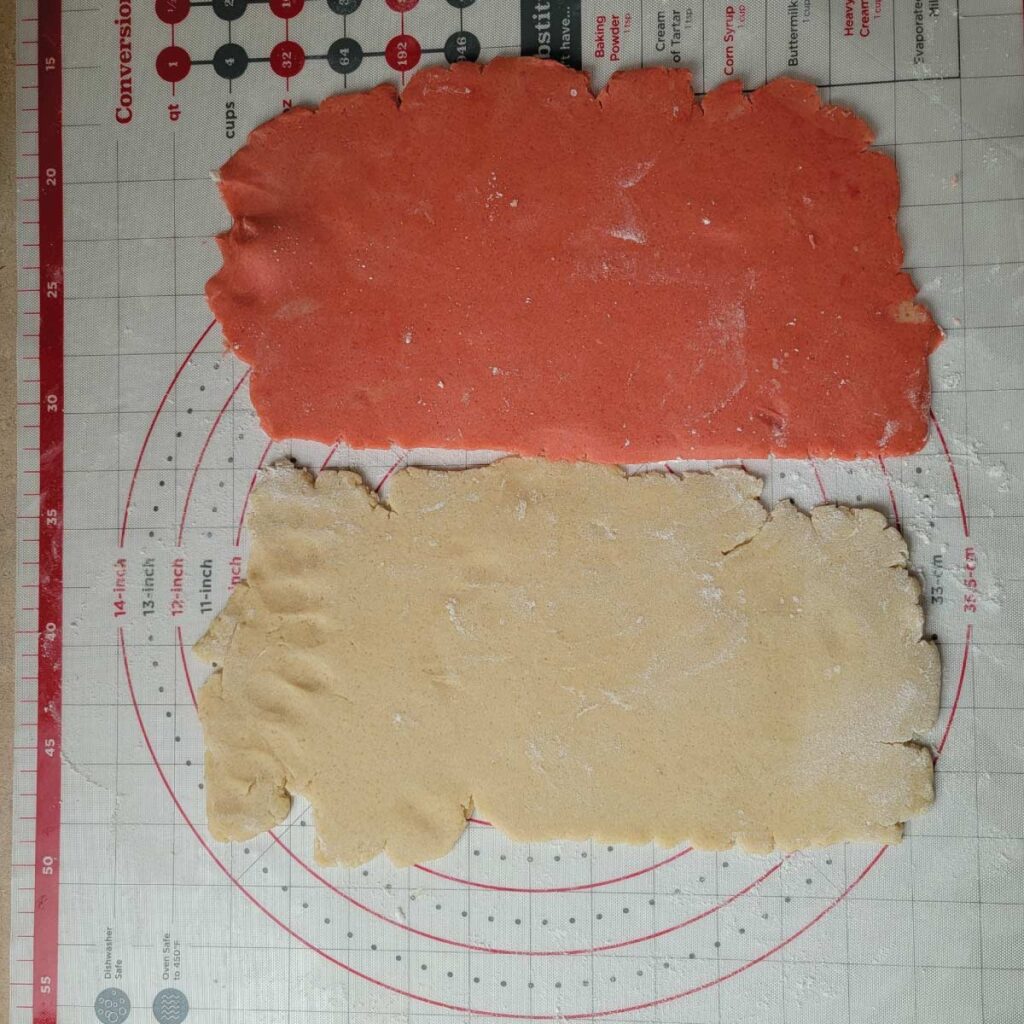
It is up to you if you put the pink on the bottom or the regular dough. Place one rectangle on top of the other and line them up as best as you can.
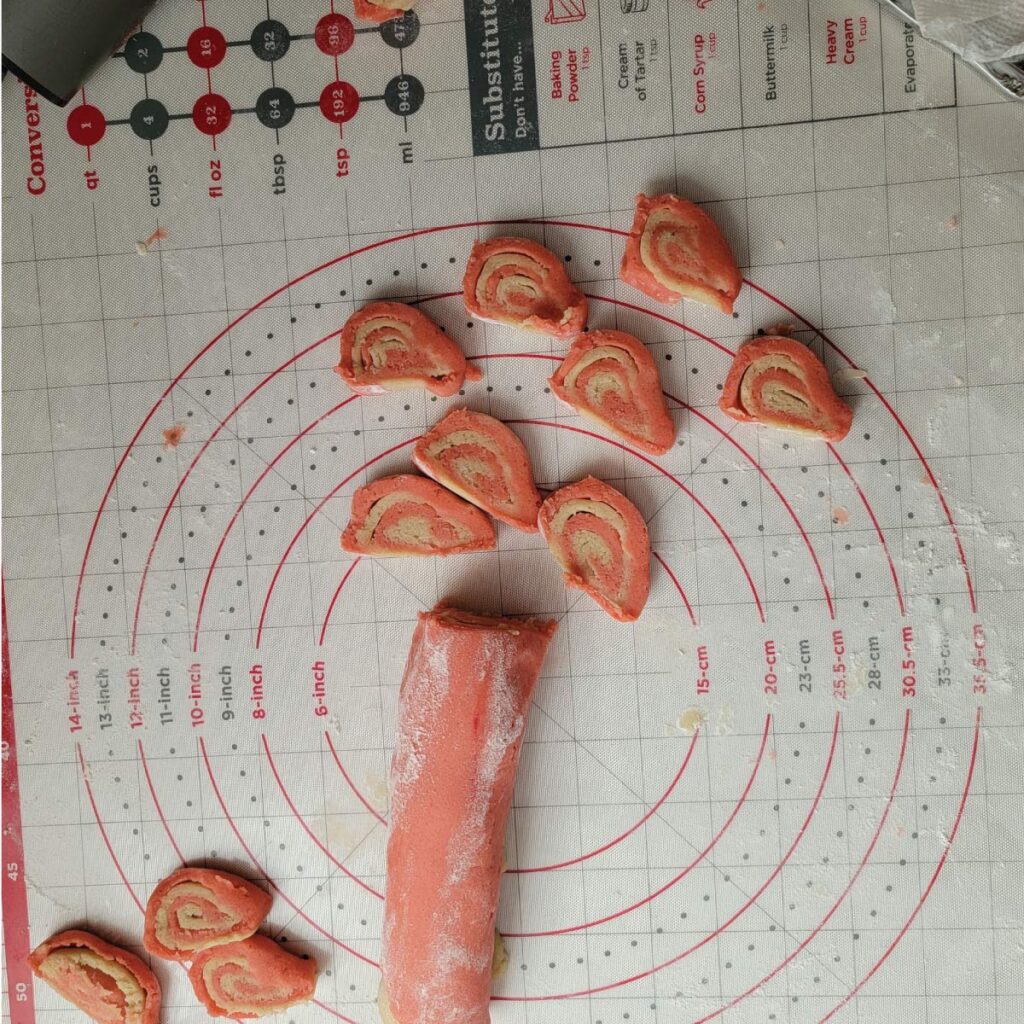
Roll it as tight as you can lengthwise so you have a long roll. With a butter knife cut the roll into quarter inch slices. Cut with a saw like motion instead of pushing the knife all the way down in a quick motion.
If you push the knife all the way down, you are likely going to flatten the slices. With a quick saw motion you will keep them in their shape better.
Repeat for the remaining dough, but keep the remaining dough refrigerated until you are about to roll it out.
Baking the cookies
We are at a very low altitude so this may need to be adjusted if you are at a higher altitude.
Be sure to preheat your oven for at least 20 minutes to be sure it is fully up to temperature.
Bake the peppermint cookies in oven preheated to 350 for about 9-11 minutes, but this depends on how thick you make them.
Check on them at the 9 minute mark. To have the softest of cookies, you don’t want any brown on them. Once they start to get a little brown on the edges, they are starting to get burnt and they will harden up after they cool down.
How do we know when our cookies are done?
You will also notice that they get a bit bigger then what the started. The edges will look set and your cookie won’t look gooey. At that point it is time to remove them.
Allow them to cool on the baking tray for about 2-3 minutes before carefully removing and putting them on a wire rack to cool. If you are familiar with baking sugar cookies, remember these peppermint cookies are very similar to sugar cookies.
Frequently asked questions
About 1 and a half to 2 weeks if stored in storage bags or cookie jars with a lid. After this time they may start to get a little stale and require dipping in milk or coffee.
No you don’t have to use any food coloring or you can even try green which is often associated with mint. Peppermint extract is clear so your cookie will be the color of a sugar cookie without coloring.
You can but I would use your hands to flatten the dough balls first. We have not tested this as a drop cookie using dough balls.
You do not need to refrigerate the dough before baking if you are not rolling it out.
Yes you can! We sometimes make the dough and use it the next day. You can leave the dough in the fridge for up to 48 hours (maybe longer but hasn’t been tested longer.)
Useful items for making peppermint cookies
As an Amazon affiliate we may earn a commission if you make a purchase through one of our links. This is at no extra cost to you and helps to keep the recipes free, thank you!
- Cookie baking sheets – We love the air bake baking sheets, but you can use your favorite. The air bake sheets have lasted longer then any other baking sheets so far for us!
- Silicone baking mats – I love silicone baking mats! The food lifts right off of them after baking. This set is different then mine because I had got mine all separately – it costs more separately, but they didn’t have the sets when I was buying mine. This set has the larger one that you can use to roll the dough out onto as well as different sizes for baking.
- Stand mixer – I would watch for sales when buying the mixer. The professional series is amazing but can be more expensive. If you are going to make a lot of bread or even homemade pasta, go with the pro series. The motor is almost twice the HP then the Artisan series.
- Cooling rack – Our favorite cooling racks! Inexpensive and sturdy.

Peppermint Pinwheel Cookies
Ingredients
- 3 cups flour
- 1 teaspoon baking powder
- 1 teaspoon baking soda
- ½ teaspoon salt
- 1 cup butter unsalted, softened
- 1½ cups sugar
- 2 eggs
- 1 teaspoon peppermint extract
- 1 teaspoon vanilla extract
- 9 drops food coloring optional – see notes
- 1 candy canes crushed – optional for decorating
Instructions
- Allow your butter to sit out at room temperature to soften.
- In a separate bowl combine flour, baking soda, baking powder and salt.3 cups flour, 1 teaspoon baking powder, 1 teaspoon baking soda, ½ teaspoon salt
- In the mixing bowl, cream the butter and sugar on a high speed for about 2 minutes.1 cup butter, 1½ cups sugar
- Add in the eggs and the extracts – both vanilla and peppermint. Mix on a high speed for about a minute.2 eggs, 1 teaspoon peppermint extract, 1 teaspoon vanilla extract
- Add in the dry ingredients. Mix on low speed until it is combined.
- If using food coloring, take out half of the dough and divide into 2 sections. Wrap separately in plastic wrap.Add in the food coloring to remaining dough and mix until it is mixed throughout. Divide into 2 sections and wrap separately in plastic wrap.
- Refrigerate the dough sections for at least 1 hour.
- Preheat oven to 350° Fahrenheit.
- Roll 1 section of pink dough and 1 section of dough without coloring to about ⅛ to ¼ inch thick rectangles. Try to get them even in size. Keep remaining dough refrigerated until ready to roll out.
- Place one of the rectangles on top of the other. Roll them up as tightly as possible lengthwise.
- Using a butter knife, gently slice through the cookie roll with a sawing motion. Make the slices about ¼ inch thick. If the layers in your slices start to loosen up, it's ok.
- Place on baking sheet about 2-3 inches apart.Bake for 9-11 minutes. The edges should appear set and the center will no longer look gooey. Do not cook them until they are browning. Remove from the oven and allow them to sit for 2-3 minutes before transferring to wire cooling rack.
Notes
Nutrition
The best peppermint cookies is step by step pictures making the cookies.
These peppermint pinwheel cookies are so easy and delicious to make! I love how fun they were. The whole family got to be a part of the process!
Sugar cookies are a favorite in our house, and the addition of the peppermint sounds really good! I’m always searching for the perfect soft cookie recipe. I’m even going to allow myself a few Christmas cookies, despite the Weight Watchers! (But I haven’t baked any yet, as I’m not ready to be trusted with them quite yet!) Thanks so much for sharing them with us at Thursday Favorite Things.
One trick with soft cookies is to make sure your butter is soft but not melted in the beginning. The other important trick is to make sure you remove them from the oven before they start to brown on the edges – it is one cookie that should not be browned at all.
I have a tough struggle with not eating too many cookies when I make them also so I get that! I bet you can do it – make them after dinner (or a nice size meal) so you are not hungry when you make them. Or you can even just drink a huge glass of water first so you are too full to eat a lot of them 🙂
Thank you for sharing at #ThursdayFavoriteThings. Pinned and shared. Have a lovely week. I hope to see you at next week’s party too! Happy Holiday!
Thank you Marilyn 🙂 Hope you have a wonderful week as well and a very happy Holiday!
Easy to make it with my little boy, I think… tasty cookies.