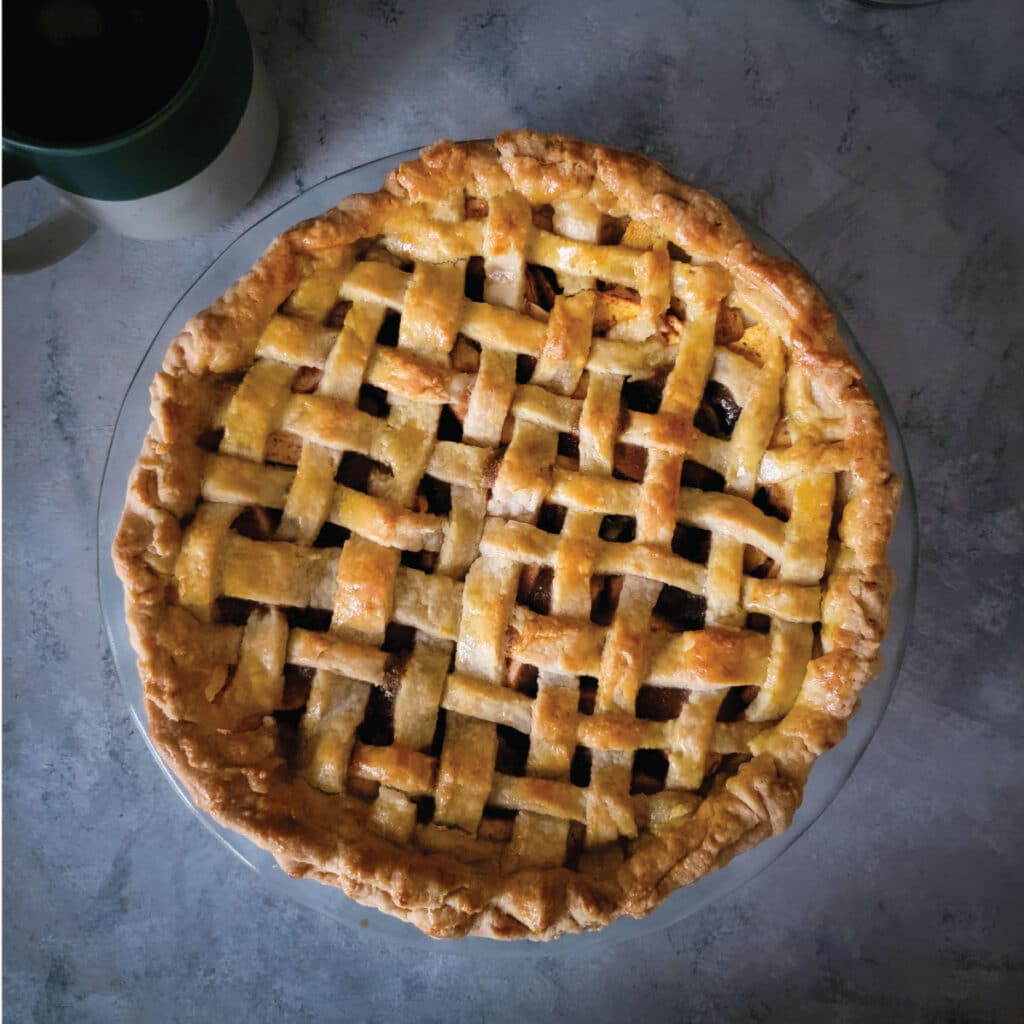
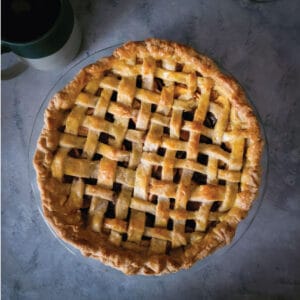
Homemade Apple Pie Recipe
Homemade apple pie is a classic dessert that brings the family together at the table! Our pie is made with brown sugar making it sweet but not too sweet and it is sure to be a favorite.
It is a traditional dessert that is loved by many. Ours is a bit sweeter then some recipes, but probably not quite as sweet as others. You can easily adjust the sweetness with the apples you use, you can use your favorites!
I can’t think of many desserts I would go to before apple pie to be honest. Tho I do have to admit that pumpkin pie (made with fresh pumpkin) is a close tie! We make both pies often in the fall and we always have both for our dessert on Thanksgiving.
We use affiliate links on our site. This post may contain affiliate links and we may earn a commission on qualifying purchases. Please see our affiliate disclosure for more details.
Apple Pie Ingredients
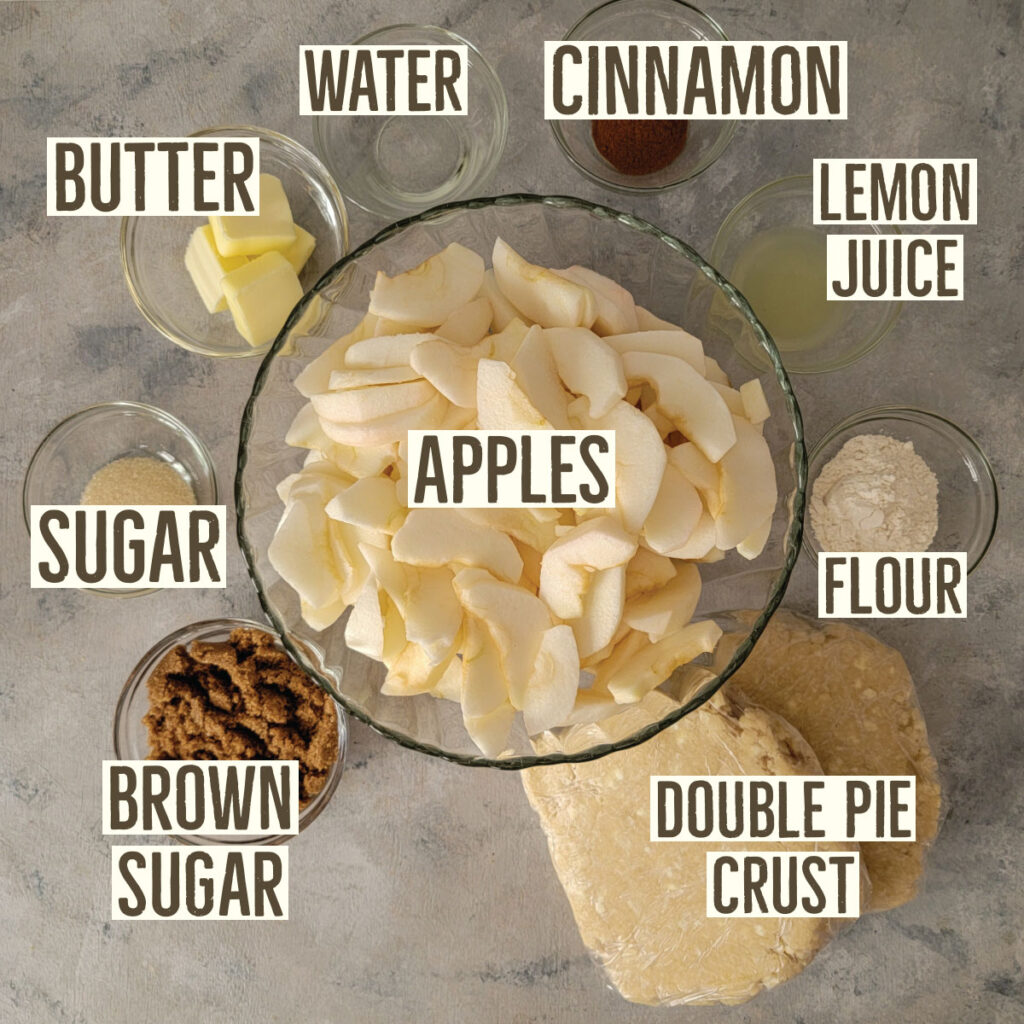
Apples – We love honey crisp, but they are very sweet in pie. See below about the different apples in pie so you can choose what is best for you.
Lemon juice – We use the bottled lemon juice here. The purpose of the lemon juice is to keep the apples from browning after being cut.
Cinnamon – Ground cinnamon adds a lot of flavor to the pie, no substitutions here.
Butter – We like to use salted butter here. You will be using it with flour to thicken the sauce going over the apples so you can use another fat in it’s place, but we think butter is best. Many oils should be a good replacement, but remember that some oils have a taste that may not go great in an apple pie. Please note that we only tested this with butter but other fats can used to make roux which is similar to what we are doing here.
Flour – All purpose is what we use here. It is to thicken the sauce.
Water – Adds a little bit more liquid to the mixture so the sauce isn’t too thick.
Sugar – Pure cane or granulated sugar.
Brown sugar – Dark brown sugar is best. It adds the best flavor – brown sugar has more molasses then light brown sugar. You can use light brown sugar in it’s place.
Crust – You will need a double crust, preferably one for a 10 inch pie. We like to use the perfect pie crust by Simply Recipes, but you can use your favorite!
What are the best apples for pie?
Honestly we use different apples all the time to try new things, but the apples you use will determine how sweet your pie is. Another thing to note is that if you are using a softer apple, it may get slightly mushy before the rest of the pie is finished cooking and the crust browns.
Our absolute favorite are honey crisp – they are sweet but oh so good! Sadly they are rarely on sale and a more expensive apple, but they are worth it to us. Honey crisp will make a sweeter pie, but they are a more firm apple so they can handle the baking.
Granny smith apples are perfect if you don’t like your pie quite as sweet. They have a more tart compared to other apples. They are good and common for pies. Granny smith apples are a more firm apple making them a great choice for pie.
Macintosh are good and sweeter then granny smith when baked, but not as sweet as others. They are a softer apple so you will notice that they will cook a bit faster, but they are still good too. I have used them many times and they are great in apple crisp too.
Red delicious is a little sweeter then macintosh, but not as sweet as some of the others. Your apple pie will be a little sweeter if you use these. They are a firm apple so they won’t cook too fast compared to the rest of the pie.
Gala are a bit sweeter and another slightly softer apple. Gala are good, I use them for a lot of things but they can get soft quickly.
You can play around with your favorites, these are the ones we have used.
Some important tips for making the pie
It is actually very easy, nothing complicated about it. The hardest part to me is rolling out the pie crust, but that isn’t too hard either.
The crust
There are many pie crust recipes out there and you may already have a favorite. See the ingredients or recipe card for our favorite! I don’t recommend the premade refrigerated crusts for this pie because they are for a 9 inch pie dish but with apple pie, you will be using a 9.5 inch pie dish.
We almost always use lattice for our top crust but this is optional. I like the look of it and it is easy to make it look a little fancier – and it is easier for when you struggle getting the pie crust rolled out perfect. Yes that is me, I am never perfect with my pie crust but I am ok with that!
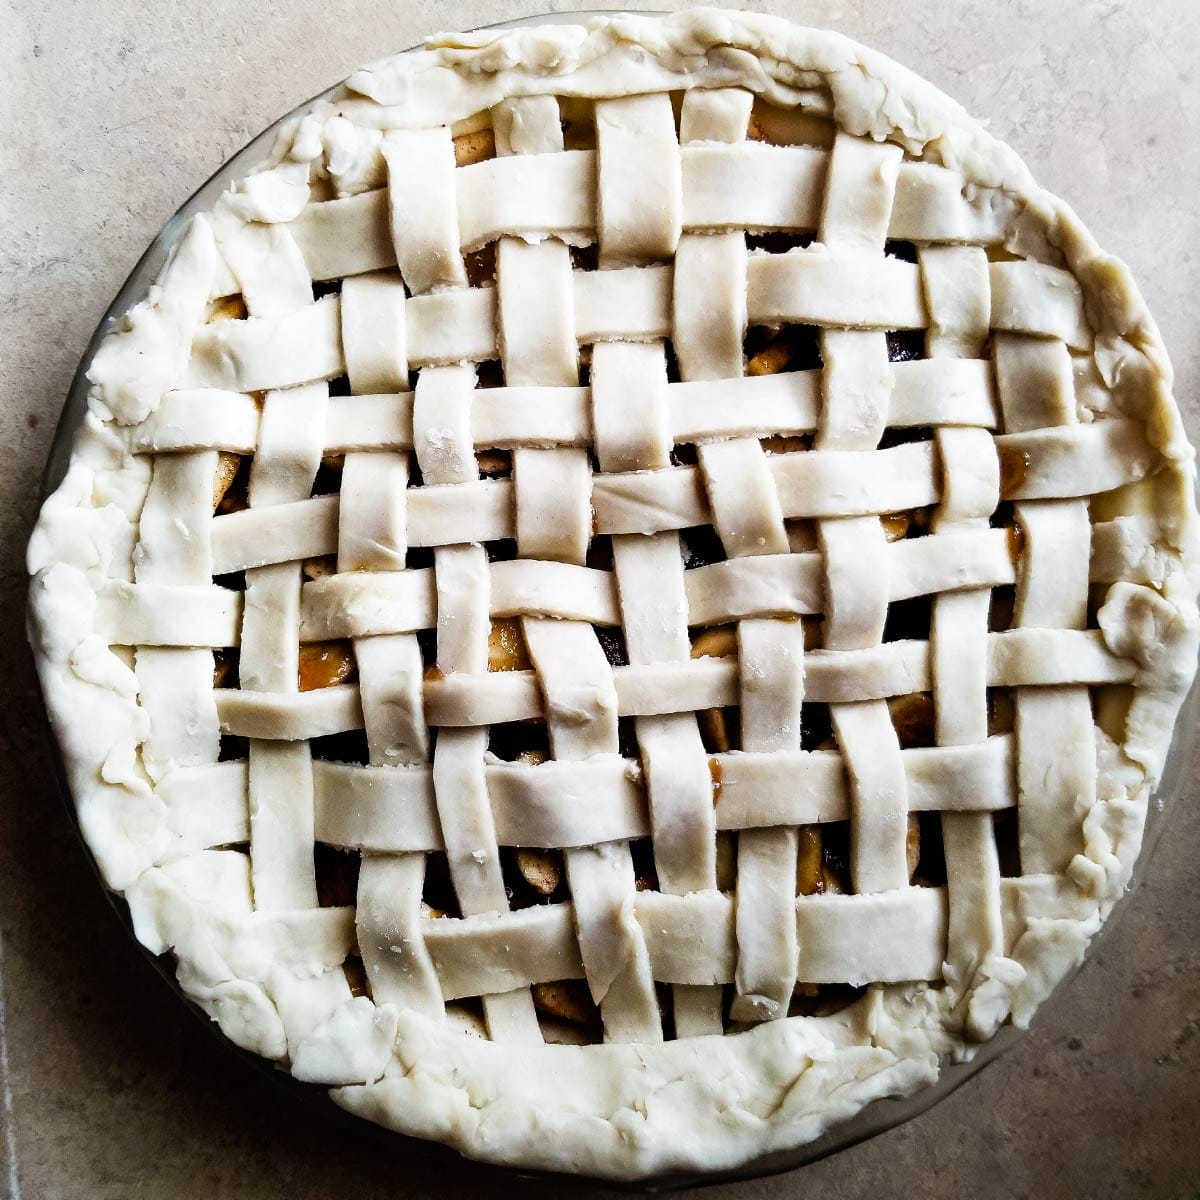
If you are not doing lattice for the top, you will need to put a couple slits in the top crust. You can do 3 or 4 slits from the center out that are about 2 inches long. As your apple pie is cooking, the steam will need to vent through the slits in the crust.
The apples in apple pie create moisture while baking. Quite often this can cause a soggy bottom crust. I like to preheat an old baking sheet in the oven as the oven is warming up and place the pie onto the baking sheet so the bottom crust can heat up right away before the cooking apples soak into it.
The other option I recommend is to brush the bottom crust with a beaten egg (after you shaped it into the pie dish) in a thin layer before adding the apple pie filling. You can do them both, brushing the egg on and the heated baking sheet or just one.
If you don’t have an old baking sheet, you can do just the egg method (apple pie runs the chance of making a mess so please do not use a brand new baking sheet!) In this case, place a piece of foil on the rack below the pie to prevent any of the filling from dripping in the oven.
On the top of the crust, whether you are doing lattice or not, I like to brush an egg wash on top – 1 egg with 1 tablespoon water or milk. This does not affect flavor so don’t panic if you forget. It will help your crust get that amazing golden shine tho!
The filling
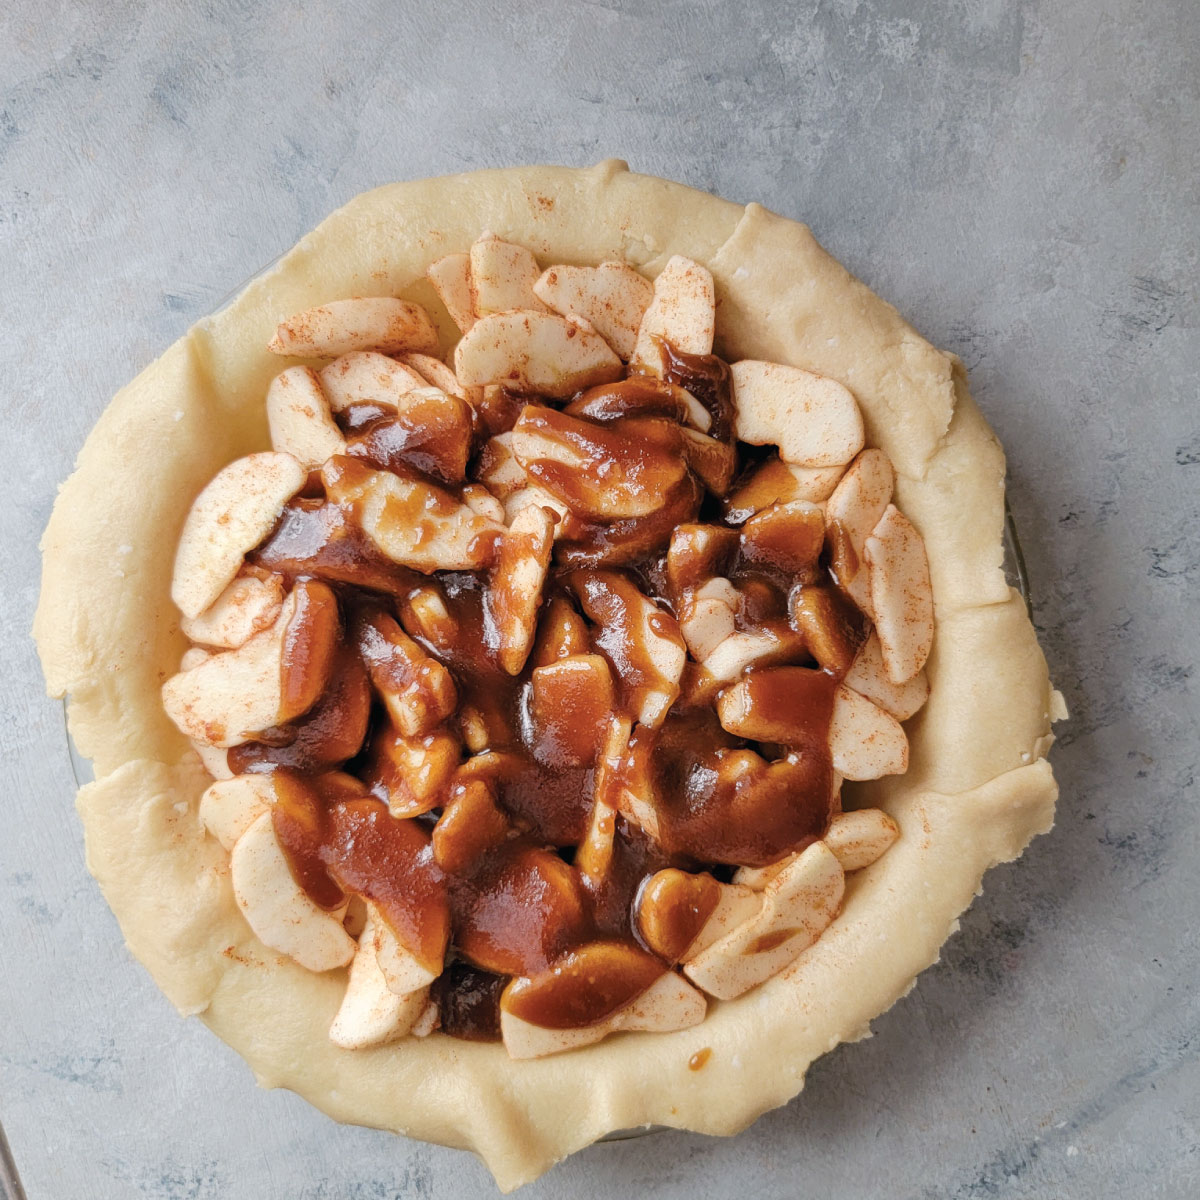
You want your apples to be slightly heaping in the pie dish. They will cook down and if you do not have them heaping, they will sink in quite a bit in the pie.
By having them heaping, you will keep the pie level once done. Without doing this, your pie will appear sunken in the middle. It is edible (still delicious) but it is best to have plenty of apples!
The sugar sauce should be thin enough to spoon over the apples but not too thin. If it looks too thick, you can put it back on the stove and add 1-2 tablespoons water to thin it out just a little bit. You don’t have to be perfect pouring this on the apples, it will mix with the juice from the cooking apples and go through the whole pie as it cooks.
The pie dish
For this recipe, we used a 9.5 inch glass pie dish. I love my fancier dish (it was a gift and I love it), but it is not a very common size so I do make this in a smaller pie dish so everybody can make it.
My favorite is an 11 inch and it’s hard to find pie crust recipes that fit it and it isn’t as common of a size either.
Cool down
This depends on if you are serving this and want it to look perfect or if it is just family and everybody wants warm apple pie!
If you cut it while it is still slightly warm, you run the chance of the filling sliding out and not getting the perfect looking slice. The pie is still delicious, but it will look a little messy. It can be hard to wait a long time for apple pie to cool down, trust me I know, but it is best for the perfect slices.
If you are not worried about how perfectly shaped your slice is, go for it and eat it warm! Just be very careful it is not too hot yet. Hot pie can cause serious burns if it is too hot.
Other great desserts
If you love our homemade apple pie recipe, here are some more delicious desserts you may love as well!
- Ultimate fudge brownies
- Chocolate swirl cheesecake – for the Instant Pot
- Layered pumpkin cheesecake
Frequently asked questions
No you put the crust directly into the pie dish. Any crust you use will have a fat in it (butter, shortening or oil) and it will not need to be sprayed.
Yes you can but do not freeze it in a glass pie dish. You can use a disposable foil pie dish or metal dish, but glass can break with the temperature differences. I do believe some but not all Pyrex dishes can go from freezer to oven, but we have not tested that and you would have to know for sure that your dish can do so.
You can freeze it before baking or after baking. It should last about 4-6 months in the freezer. If you are freezing it after baking, be sure to cool it all the way first. Place it in the freezer for an hour or 2 before placing in a freezer bag to prevent excess moisture in the bag from the temperature differences.
Do not brush egg wash on before freezing, brush it on the frozen pie just before baking.
Do not thaw first because you are likely to get a soggy crust if you do!
To reheat already baked pie – Place in the oven at 350 degrees Fahrenheit for about 15 minutes. Heat until it is heated through, remove and enjoy!
To cook a frozen unbaked apple pie – Place in the oven heated to 425 degrees Fahrenheit and cook for 25 minutes before dropping the oven temperature to 350 degrees. Continue baking for about 40-50 minutes, until it is cooked through and the crust is a nice golden brown.
Some useful items for this recipe
As an Amazon affiliate we may earn a commission if you purchase items from one of our links. This is at no extra cost to you and helps us to provide the free recipes you love!
- Glass pie dish – This is our favorite, we love Pyrex! Inexpensive and perfect. This is a 2 pack which is how we purchased them as well. It is cheaper then some of the other individual pie dishes.
- Metal disposable pie dishes – Only recommended if you are freezing the pie. We prefer glass but don’t freeze the glass pie dishes!
- Wire cooling rack – This Wilton wire rack is inexpensive and perfect for heavy pies. They don’t bend in the middle as much as some of the cheaper made racks. Some racks will bend down to the counter with the weight of a pie, this one will not. We use it for everything we need a cooling rack for!
- Silicone basting brush – Nothing expensive, but I prefer silicone for basting brushes. I don’t use the hair basting brushes, sometimes the hairs fall out and into the food. Silicone works great for all basting needs!
Homemade Apple Pie
Equipment
Ingredients
- 1 double crust for 10 inch pie see notes for our favorite
- 7 cups apples peeled and sliced, see notes
- 1 Tablespoon lemon juice bottled is ok
- 1 Tablespoon sugar
- 1 teaspoon cinnamon
Sauce for apple pie
- 4 Tablespoons butter we use salted
- 2 Tablespoons flour
- 2 Tablespoons water
- ½ cup dark brown sugar packed
Optional egg wash – for shine and preventing a soggy crust
- 2 eggs beaten in 2 different dishes
- 1 Tablespoon water or milk, to be added to 1 egg
Instructions
- Preheat oven to 425°F
- Peel and slice the apples. Without the pie crust, place them in the pie dish until they are slightly heaping. Then remove and place in a bowl. – this step is to be sure you have enough apples for a full pie.
- With the apples in a bowl, evenly pour the lemon juice across the top of them. Sprinkle the granulated sugar and cinnamon on top and mix to coat the apples. Set aside.
- Place the bottom crust into the bottom of the pie dish. Using a fork, poke a couple holes in the bottom of the crust. Optional – carefully brush a thin layer of beaten egg (without the water) over the crust before adding filling to prevent a soggy bottom crust.
- Dump apples into the crust and set aside while you make the sauce.
Making the sauce
- Melt the butter in a small sauce pan over medium heat. Add the flour and stir constantly for 1 minute.
- Add the water in 1 tablespoon at a time while stirring. It will thicken quickly, only cook for about 20 seconds stirring constantly.
- Add in the brown sugar. Stirring frequently, cook for 1 minute and remove from heat. If it is too thick to pour nicely over apples, add another 1-2 tablespoons of water and heat through. It will thin it.
Finishing the pie
- Carefully spoon the sauce over the apples while it is still hot. Try to spoon it evenly, but it will distribute while baking.
- Place the top crust over the apples. Either use lattice or be sure to put slits in the top crust so steam can vent. You can put 4 slits from the center out (about 2 inches long) if not using lattice.
- Optional – if you want a shiny crust on top use an egg wash. Mix the other beaten egg with 1 tablespoon water. Carefully spread a thin layer on top of the pie before baking.
- Either place a piece of foil on the rack below your pie or place your pie on an old baking sheet to prevent a mess in the oven. See notes
- Bake in middle of oven at 425°F for 10 minutes and reduce temperature to 350°F. Continue baking for 35-45 minutes. It will be bubbly, your apples will be soft and the crust should be a nice golden brown.
- Remove from oven and place on a metal cooling rack until completely cool. You can eat it warm but it will not slice neatly with hot filling, the filling may slide out a little if it is warm.
Notes
Nutrition
For step by step slide – the best apple pie.
This pie is stunning and has the best flavors!
Classic and still one of the best recipes, excited to make this too.
Apple pie is one of my favourite fall desserts. Yours is beautiful!
This is the best pie!! Its a classic for a reason!
I love your recipe. I make my apple pie a little the same, but sometimes I get a soggy bottom, so I have to try your using your old baking sheet trick.
I like mixing Granny Smith apples and honey crisps, so it’s not super sweet, and it’s a bit tart.
Apple pie is my favorite so I’m so excited to try your recipe!
Yeah soggy crust happens with a lot of pies due to the filling soaking into the crust before the crust fully bakes. I hope the old baking sheet works out for you!
Not too much sugar so this is GREAT! Who doesn’t need a fabulous apple pie on Thanksgiving, right? Thanks!!
Looks amazing and thank you for all the easy to follow instructions. Baking is not my forte therefore appreciate it
This apple pie looks so delicious! I can’t wait to make it for Thanksgiving!